Jump to content


Photo

Unique Front Door


  • Please log in to reply
3 replies to this topic

#1 Sam Morgan

Sam Morgan

    Advanced Member

  • Members
  • PipPipPip
  • 851 posts

Posted 29 April 2016 - 05:33 PM

I have a client that has an odd front door request and I'm stumped as far as drawing it.  


They want a 5' wide front door that is mostly a huge piece of glass and hinged so the door rotates and swings out of the way....something like a single panel nana wall type door.  Any suggestions on how to draw that short of making a new custom symbol?   Link to their idea below


Sam


http://www.houzz.com...entry-charlotte


#2 Keith Almond

Keith Almond

    Advanced Member

  • Members
  • PipPipPip
  • 5,099 posts
  • LocationBrockville, Ontario, Canada

Posted 29 April 2016 - 09:05 PM

For the plan, How about a double door one 42" wide and one 18" wide both hinged in the centre, with the smaller panel opening out at 45° and the larger opening in at 45°. Link it to a single fully glazed opening for the 3D.


Don't know if it will work, just throwing ideas about ....


Keith

There are 10 types of people in this world ....... Those who understand binary, and those who don't.

Softplan user since version 5.5.2.5

www.homehardwarekingston.ca

#3 Keith Almond

Keith Almond

    Advanced Member

  • Members
  • PipPipPip
  • 5,099 posts
  • LocationBrockville, Ontario, Canada

Posted 30 April 2016 - 07:53 AM

Done a little experimenting ...


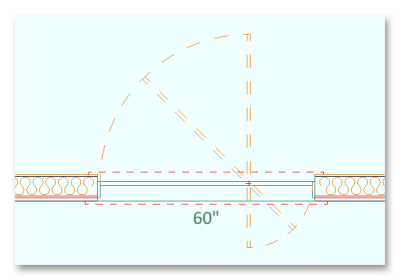
The simplest method is to use a 60" standard fully glazed door. Show it shut (Door swing 0) in plan and draw where it opens. It shows correctly in 3D as long as you don't have it OPEN IN MODEL.


2016.04.30_08h47m12s_001.png


The next method is a little more complex, but shows correctly in plan, Again, don't have it OPEN IN MODEL.


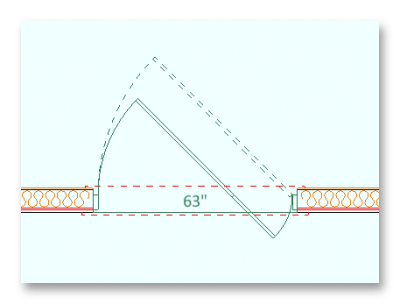
Start with the same 60" fully glazed door as above, then create a new door and a half - I've assumed 42" and 18", but obviously can be adjusted to suit.


FILE > SYSTEM OPTIONS > SYSTEM LIBRARY - Go to OPENINGS > EXTERIOR DOOR > ONE STEP and give the opening a name (I chose "Centre Pivot Door") - CHECK Use Existing Opening - Choose a suitable standard Door - OK

EDIT ENTIRE OPENING and on the Exterior trim and Interior trim tabs uncheck the trim - OK

EDIT INDIVIDUAL COMPONENT - On the component Tab Change the WIDTH to 42", OPERATE to R, and SWING to 45 - On the ELEVATION tab uncheck frame Right - OK

Click ADD - Select ADD CUSTOM (NEW) OPENING - Type DOOR - and choose a door to suit (although it really doesn't matter which, as the 3D will be provided by the 60" door above), and add it to whichever side of the door you want it - In my case I used the right side - OK

EDIT INDIVIDUAL COMPONENT - On the component Tab Change the WIDTH to 18", OPERATE to L, and SWING to -45 (MINUS 45) - On the ELEVATION tab uncheck frame Left - OK

EDIT ENTIRE OPENING and on the Exterior trim and Interior trim tabs recheck the trim, if required (just so it's consistent on plan) - OK


Door with will probably show as width over frame, depending on how you have your options set.


Draw the just saved door in the wall next to the original 60" door.


Edit both doors to EXCLUDE FROM UNIT OPENINGS.


Edit the single door to HIDDEN - or put it on a layer you can turn off - (Obviously it won't now print), and edit the new double door, and uncheck EXTRACT IN MODEL


And position both doors in the same place. The plan will show as the double door and the 3D as the single door.


2016.04.30_09h51m35s_003.png


2016.04.30_09h53m11s_004.png


Hopefully, I listed all the steps, but if I missed anything, or things don't work, let me know.


Sam, I know this is oversimplified for you, but it may help any newcomers that aren't as experienced as you.


Keith

There are 10 types of people in this world ....... Those who understand binary, and those who don't.

Softplan user since version 5.5.2.5

www.homehardwarekingston.ca

#4 John Luther

John Luther

    Member

  • Members
  • PipPip
  • 28 posts
  • LocationHungerford, TX

Posted 30 April 2016 - 08:14 AM

As a builder, I sometimes kill 2 birds with one stone for a specialty product:


find a manufacturer that meets the requirements, and (as available) import their CAD files - use or close match in SP for renderings


then as required - I have done the work for the actual build - can spec and configure facilitating support of a select product


build scope or not - planning clients like products specified to point of purchase  


John Luther

Hungerford, TX 

www.brotherscustomworks.com


0 user(s) are reading this topic

0 members, 0 guests, 0 anonymous users