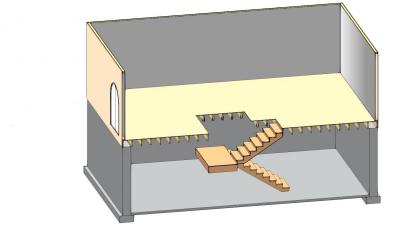
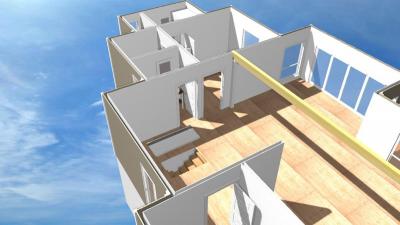
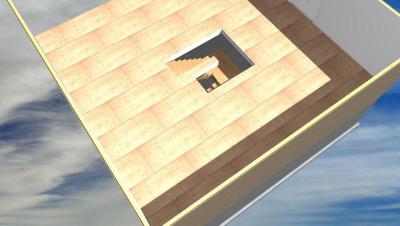
I'm trying to place a foldback stair from the main floor to the basement. In 3D I see that it's going up and I can't find where to offset it down in EDIT. In the elevation offset I can change up or down but not the distance, what am I missing?
Stair placement
#4

Posted 22 March 2015 - 05:18 PM
You should be able to offset it down by whatever amount that you choose. Turn cleanup off on the common tab. That should allow the distance to be input.
There are 10 types of people in this world ....... Those who understand binary, and those who don't.
Softplan user since version 5.5.2.5
www.homehardwarekingston.ca
#6

Posted 23 March 2015 - 11:11 AM
i find it best to draw the 3d stairs on the lower plan.
one reason is they go UP from there automatically.
another reason is if you EDIT the stairs,
you can click "STAIR OPTIONS"
and right under the words "HEAD CLEARANCE"
you click "create framed hole" and it'll cut
a hole in the floor system above the stairs (in floor plan above)
and also cut the hole above the stairs with the correct "head clearance".
note: i haven't tried doing the head clearance cut hole when
stairs are on the upper floor plan to see if they'd cut a hole
in the floor system below them.
note: i've done stairs on the upper floors going down and
on the lower floors going up and they just seem to work
easier when the stairs are going up. (less editing)
i'm sure there are times when you'd draw them going down.
NOTE: you can always put stairs on any floor and "EXPLODE" them
and then edit, erase, move, adjust, cut, etc the lines that are left)
(NOTE: can right click on the stairs and there's and "EXPLODE ITEM" in the list)
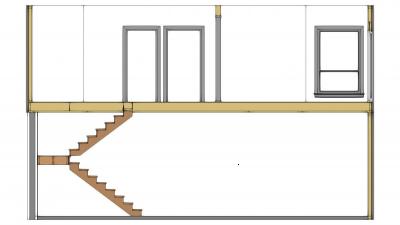
check out the section below showing the hole that is cut above the stairs.
notice the hole cover some of the lower run of stairs in the foldback.
it knows where to cut the hole so you have the proper head clearance that
you set in your stairs options.
randy
v10 to future 2016+ ![]()
#7

Posted 23 March 2015 - 05:06 PM
#8

Posted 23 March 2015 - 06:29 PM
don't know why the rise in your section is different, i'd have to see you SPD files.
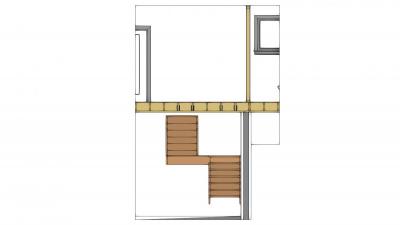
the reason you have a section of floor between the 2 sets of stairs is
your stairs are spaced apart from each other. you get that by having
one WIDTH for the landing which is the the whole foldback stair width and than the individual stair width.
you can cover the end of joists with either a drawn single (or dbl joist) in floor framing (you'll have to
determine how you and/or you engineer wants to frame this. note: you can always add floor to
ceiling walls in the basement drawing to support that floor that between the stairs.
or
you can RIGHT click on the HOLE in the floor system of the upper plan with the stairs
and click EDIT in the window that opens and check > "add drywall" > as shown in image below
randy
v10 to future 2016+ ![]()
#9

Posted 23 March 2015 - 06:29 PM
The rise isn't different in the 2 sections, it's just that the section line was cut through the stair, so you can't see the top and bottom risers. Count them ....
Not sure why the created framed opening is only over the staircases. and Not the landing. Did you create a foldback stair, or did you use a separate landing? Did you explode the stair into components?
Typically a hole is only framed if it's a rectangle.
There are 10 types of people in this world ....... Those who understand binary, and those who don't.
Softplan user since version 5.5.2.5
www.homehardwarekingston.ca
#10

Posted 23 March 2015 - 07:58 PM
don't know why the rise in your section is different, i'd have to see you SPD files.
the reason you have a section of floor between the 2 sets of stairs is
your stairs are spaced apart from each other. you get that by having
one WIDTH for the landing which is the the whole foldback stair width and than the individual stair width.
you can cover the end of joists with either a drawn single (or dbl joist) in floor framing (you'll have to
determine how you and/or you engineer wants to frame this. note: you can always add floor to
ceiling walls in the basement drawing to support that floor that between the stairs.
or
you can RIGHT click on the HOLE in the floor system of the upper plan with the stairs
and click EDIT in the window that opens and check > "add drywall" > as shown in image below
randy
v10 to future 2016+ ![]()
#11

Posted 23 March 2015 - 07:59 PM
don't know why the rise in your section is different, i'd have to see you SPD files.
the reason you have a section of floor between the 2 sets of stairs is
your stairs are spaced apart from each other. you get that by having
one WIDTH for the landing which is the the whole foldback stair width and than the individual stair width.
you can cover the end of joists with either a drawn single (or dbl joist) in floor framing (you'll have to
determine how you and/or you engineer wants to frame this. note: you can always add floor to
ceiling walls in the basement drawing to support that floor that between the stairs.
or
you can RIGHT click on the HOLE in the floor system of the upper plan with the stairs
and click EDIT in the window that opens and check > "add drywall" > as shown in image below
randy
v10 to future 2016+ ![]()
#12

Posted 23 March 2015 - 08:11 PM
Are you trying to get your post count up again Randy .... ?
There are 10 types of people in this world ....... Those who understand binary, and those who don't.
Softplan user since version 5.5.2.5
www.homehardwarekingston.ca
#13

Posted 23 March 2015 - 09:28 PM
sorry, flashback to the 60's.
i give permission to the webmaster to delete all of my obvious duplications.
too bad we can't delete our own posts.
btw, below is in reply to the thread about wall joins.
so far 2016 has done a bang up job on joining all types and heights of different walls.
a siding wall butting up to the end / side of a block wall has the framing butting to
the side of the block and has the drywall covering over the end of the block.
keith,
on my honor i'll do my best to post final results when i work with someone off camera.
i do that when it's too difficult to work it out on the forum.
i have been at fault for not letting you all what the final solution was.
sometimes they were fairly complicated because the drawings were so screwed up. sorry pupils.
they were things we've all done when we were leaning.
90% of the time was spent just figuring out where the drawee went wrong.
sometimes i went back to the beginning and explained how to draw in softplan.
that was time well spent.
NOTICE: my nephew eric danes 2nd season of "THE LAST SHIP" is starting soon,
thanks for watching it. pop quiz during the 2nd season.
for those that don't know eric dane, he was "McSteamy" on greys anatomy.
he plays the captain of the last ship - tom chandler
his picture on link below:
http://www.thelastshiptnt.com/
randy
v10 to future 2016+ ![]()
#14

Posted 24 March 2015 - 03:07 PM
The rise isn't different in the 2 sections, it's just that the section line was cut through the stair, so you can't see the top and bottom risers. Count them ....
Not sure why the created framed opening is only over the staircases. and Not the landing. Did you create a foldback stair, or did you use a separate landing? Did you explode the stair into components?
Typically a hole is only framed if it's a rectangle.
Keith, you're right...been away too long, and I can't remember a damn thing from when I used v.10 - v.12
I used the foldback stair not a separate landing... but it wasn't exploded
and thanks for clearing up the framed hole mystery for me.
#17

Posted 25 March 2015 - 11:16 AM
aj,
randy email:
rpcdesign@aol.com (put Softplan roof help in subject area)
NOTE: there's some questions i have with the images your posted on splash/
the more information you put on the plans, the easier it'll be for me.
i'd really like you to send me what you have as far as SPD (important) files and the SPP (project file) (one file)
also put in the pitches of all the roofs and any notes in the roof mode and also on the roof plan.
put the style of style of edges on the plan (hip, gable, etc).
note: could you put the room names on the plans and any important wall height notes.
and anything else that would help me to understand what's happening.
include your softplan version, name, phone numbers, time zone, country (i only have free calling to canada and usa)
randy
v10 to future 2016+ ![]()
0 user(s) are reading this topic
0 members, 0 guests, 0 anonymous users


