Jump to content


Photo

Building Options


  • Please log in to reply
16 replies to this topic

#1 Yvon Gonthier

Yvon Gonthier

    Advanced Member

  • Members
  • PipPipPip
  • 1,288 posts
  • LocationOttawa

Posted 13 November 2015 - 04:18 PM

Wow, my brain is fried. Finished transferring my 1rst plan to 2016 with the new building options set-up. Took me a little to fully understand the way Softplan was working with the different building options.

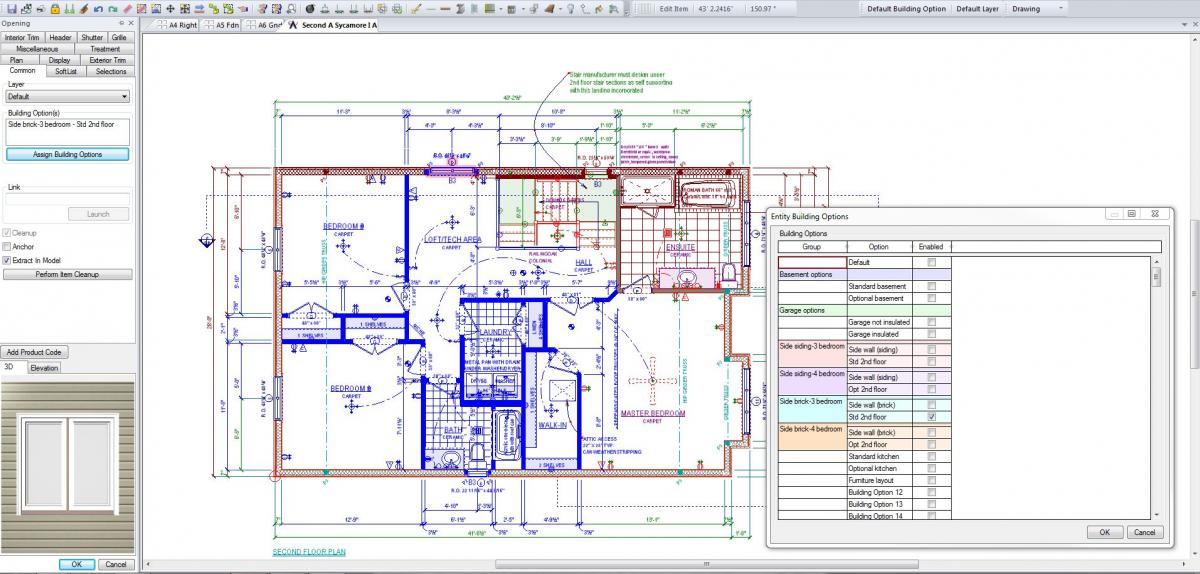
Working with single building options is basically the same as it was except improved because you can move and sort the order they appear in the display (and assign titles). Where it gets a bit more complex are the groupings. I taught you could drag and drop and copy the existing building options in different groups, but that is not the case. You have to create the different building options that repeat inside each group that it applies to, than edit your existing building options to the new ones.

I have multiple building options for every model. In the past, as was the case in this plan, I still had to create two 2nd floor plans (in this example) because of overlapping building options (std and opt floor plan with side wall at different location if the ground floor wall below is finished in siding or brick for interior and corner lots). So combining the different 2nd floor together has an impact on the building options grouping for all floors, some elevations, sections and title blocks (drawing mode, area, ceiling, floor system, interior, etc...)

Starting with an existing plan is probably more complicated than starting with a new plan.

Some things to keep in mind with the new set-up are;
1- When you edit an item to link it to a building option, you must uncheck the "Default" box for it to work only with building options.
2- You link items only to the building option it relates to, not all building options that are in the grouping (unless required).

It will take a while to get everything sorted out but this is a great improvement (at least one improvement I've been requesting).

Attached Thumbnails

  • Building Options.JPG


#2 Keith Almond

Keith Almond

    Advanced Member

  • Members
  • PipPipPip
  • 5,099 posts
  • LocationBrockville, Ontario, Canada

Posted 14 November 2015 - 09:41 AM

Never worked with the Building Options, as all my work is one off Custom Home work, but it looks very interesting (and complicated).


Keith

There are 10 types of people in this world ....... Those who understand binary, and those who don't.

Softplan user since version 5.5.2.5

www.homehardwarekingston.ca

#3 AJ Spino

AJ Spino

    Advanced Member

  • Members
  • PipPipPip
  • 91 posts

Posted 15 November 2015 - 11:27 PM

So what if you haven't used Building Options or Groups before and the "Help" menu leaves you more confused than before you started.  How do you use them to show an Addition (see attachment) to an existing house? Do you use a different Building Option for the Garage, Roof, Floor System etc.?  Is the existing house the Default B/O and any modifications start with B/O 1?  Why do you have to turn off the Default B/O?  Where do the Groups come in?


Sorry for all the questions, I just can't seem to get my head around Building Options.

Attached Thumbnails

  • MAIN FLOOR (PRE-DEMO).jpg


#4 Yvon Gonthier

Yvon Gonthier

    Advanced Member

  • Members
  • PipPipPip
  • 1,288 posts
  • LocationOttawa

Posted 16 November 2015 - 09:19 AM

BUILDING OPTIONS (PART 1)

First, lets start with the major differences between layers and options;

1- Layers; when you turn it off on a plan, it only turns off the visibility on that plan. If you generate a 3D, elevations, sections or Softlist, it will still appear. Even if you have the same layer on different plans in a project, turning it on and off only affect the drawing your on.
2- Options; when you turn it off, it turns off the building option or group on every plan in your project including 3D, elevations, sections and Softlist

Using Building Options doesn't save time originally, as a matter of fact it's a bit longer. We use it extensively because, as a builder, we put out our standard models then modify them as per sale for the client's needs. The time saver occurs when you make modifications to plans (upgrading, code changes, etc...) so you limit the number of plans that you have to make modifications on. In the example I'll refer to, I have 10 title pages (A1 to A10)that by selecting the active options or groups that I want, the proper mix appears on every pages, Without this, I would have 23 pages.

There are 2 major ways to work with options;
1- Draw your standard plan, edit the items that will need to be on an option (in your example, no addition) or draw them right away on the building option layer if you can figure it out. Turn off your "No addition" building option layer and draw your "Addition layer". I find this can get confusing specially dealing with floor systems, ceilings, interiors. etc...
2- I prefer to complete the drawing with no addition, copy and make modifications for the addition. I will then print the drawings and highlight the items that are only applicable to the "No addition" and "Addition". I will then edit the original plan to edit all items that are only applicable to the "No addition" to put them in that Building Option. It's important at this point that you associate theses items ONLY to the building option that it relates to and NOT have Default checked because if Default is checked, when you try to turn off the Building Option, it will still be visible because Default is always active.

On the plan with the addition, I'll erase everything that is common to both plan to keep only items that are unique to the addition (including joists, ceilings, etc...). I then edit to put everything on the "Addition" building layer. Once complete, I will merge in into my main plan. I then complete the missing dimensions, electrical connections, etc...

In the example included, I'm doing a side wall that has a siding wall above (interior lot) and brick wall above (corner lot).

Part 2 to follow later....

Attached Thumbnails

  • Basement side siding.JPG
  • Basement side turned off.JPG
  • Basement side brick only.JPG
  • Basement side brick.JPG

  • Carole Berg likes this

#5 AJ Spino

AJ Spino

    Advanced Member

  • Members
  • PipPipPip
  • 91 posts

Posted 16 November 2015 - 10:02 AM

Yvon,


Thanks for such a detailed explanation, it's quite a bit to take in and process...I'll give it  a go.


#6 Yvon Gonthier

Yvon Gonthier

    Advanced Member

  • Members
  • PipPipPip
  • 1,288 posts
  • LocationOttawa

Posted 16 November 2015 - 02:46 PM

BUILDING OPTION (PART 2) SIMPLE BUILDING OPTIONS


The basic Building Option is the only option that Softplan had before 2016. It's basically a this or that option selection (in this example, standard or optional basement). This is when you don't have options overlapping each other.


To sort your options in 2016, in the Model tab>Building Options, you can click on "Add group" to add a group (in this case "Basement Options") which is just a title. Checking that box or not won't change anything. You check the box below that title for the option that you want active, in this case either "Standard basement" or "Optional basement". Options are not limited to two options. The nice thing in 2016 is that you can sort the order of the group and options. If you right click and hold the box with 3 dots (left of group), you can drag it and release where you want it.


Part 3 to follow...


Attached Thumbnails

  • Standard basement.JPG
  • Optional basement.JPG
  • Sorting building options.JPG


#7 Yvon Gonthier

Yvon Gonthier

    Advanced Member

  • Members
  • PipPipPip
  • 1,288 posts
  • LocationOttawa

Posted 16 November 2015 - 03:33 PM

BUILDING OPTION (PART 3) BUILDING OPTION GROUPS

This level is a bit more complex but very useful. It combines your sorting and options that overlap. In this example, I have a building option for a standard 3 bedroom and an optional 4 bedroom as well as an option for side wall in siding or brick at the ground floor (affects the positioning of my side wall at the 2nd floor). In this case, you insert your Building Options within the Group. You'll see that the group and its color expands with the Options. This way, when you check or uncheck the box beside the Group title, all the boxes for visibility for the Building Options within this group will turn on or off.

As you can see, the Building Option "Std 2nd floor" appears in the "Side siding-3 bedroom" group as well as "Side brick-3 bedroom" group because it can be active in one or the other. This differs from Building Options in 2014 or Simple Building Options where you insert it in only one option.
In the "Side siding-3 bedroom" and "Side brick-3 bedroom" example, the window in the Loft/Tech Area is programmed in one "Std 2nd floor" option for the "Side siding" and in another for the "Side brick" because its appears in one or the other.

In the "Side brick-4 bedroom" example, the window in the Bedroom #2 is programmed to be in the "Opt. 2nd floor" for both the "Side brick-4 bedroom" and "Side siding-4 bedroom" because that window is in a wall that's on the "Default Building Option" compared to the window in the previous example that's in a wall that's on one Building Option or another.

It takes a little getting use to but once you get the concept, it's a nice option. Hope it can help someone ;o)

Attached Thumbnails

  • Side siding-3 bedroom.JPG
  • Side brick-3 bedroom.JPG
  • Side brick-4 bedroom.JPG

  • Keith Almond likes this

#8 Thomas Roman

Thomas Roman

    Advanced Member

  • Members
  • PipPipPip
  • 341 posts
  • LocationSacramento, CA

Posted 16 November 2015 - 04:01 PM

One area where I have found that Building Options work really good for "one-off" custom design work is if there are "future areas" to be looked at...


I can design the project to accommodate the phase 2 / future additions, but easy to quickly toggle the future areas on/off, for documents and 3D renderings....


#9 Philip Frank

Philip Frank

    Advanced Member

  • Members
  • PipPipPip
  • 560 posts
  • LocationMaine, USA

Posted 17 November 2015 - 05:51 AM

I use Building Options when I'm doing additions. I use SoftList on every project I do and put all the "Existing" elements on a Building Option named "Existing". When it come time to run a material list, I simply turn off the "Existing building option and none of those elements are reported. Turning of the Existing building option also gives me a visual confirmation that I'm not going to report on any of the existing building.


  • Keith Almond likes this

#10 Keith Almond

Keith Almond

    Advanced Member

  • Members
  • PipPipPip
  • 5,099 posts
  • LocationBrockville, Ontario, Canada

Posted 17 November 2015 - 07:13 AM

Excellent idea Philip. I may give that a go on my next addition. Even though I don't use material lists.


Keith

There are 10 types of people in this world ....... Those who understand binary, and those who don't.

Softplan user since version 5.5.2.5

www.homehardwarekingston.ca

#11 AJ Spino

AJ Spino

    Advanced Member

  • Members
  • PipPipPip
  • 91 posts

Posted 17 November 2015 - 08:01 AM

Yvon,


Thanks again for the detailed explanation...extremely helpful to a first time Building Option user.  I truly appreciate the time you took to put everything in perspective.


  • Yvon Gonthier likes this

#12 AJ Spino

AJ Spino

    Advanced Member

  • Members
  • PipPipPip
  • 91 posts

Posted 17 November 2015 - 08:09 AM

Philip,


Are your "Existing" elements the Default Building Option or do you draw everything on the Default B/O and then edit individual elements to the appropriate B/O?


#13 Philip Frank

Philip Frank

    Advanced Member

  • Members
  • PipPipPip
  • 560 posts
  • LocationMaine, USA

Posted 17 November 2015 - 11:10 AM

I draw everything on the Default building option and then move elements that are in the "Existing" onto the " Existing" building option when I am finished with the design. If the "Existing" Building Option is turned off when you do this, the items will disappear as they are put on the building option. Once I have changed one item to the correct building option I use Repeat Edit or Repeat Edit Box to change anything else that I want to go on the "Existing" option. It goes pretty fast and when you're done  you get a visual confirmation in both 2d and 3d that the existing parts of the building are not going to report in SoftList. (important for me).


#14 AJ Spino

AJ Spino

    Advanced Member

  • Members
  • PipPipPip
  • 91 posts

Posted 17 November 2015 - 11:55 AM

Thanks Philip!


#15 Colin Smith

Colin Smith

    Newbie

  • Members
  • Pip
  • 8 posts

Posted 21 March 2017 - 08:14 AM

Is there a way to set multiple items to the same building option in one step? Or do I need to set each individual object to the particular Building Option?


Nevermind....I just realized I can accomplish this with repeat edit box.


#16 Yvon Gonthier

Yvon Gonthier

    Advanced Member

  • Members
  • PipPipPip
  • 1,288 posts
  • LocationOttawa

Posted 21 March 2017 - 08:27 AM

Or if it's the same items or group of items, you can right click on one, select Add Selection or Add Group Selection (or the other option) and then right click again and select one of the edit options and select the builsing option.


#17 Dennis Swihart

Dennis Swihart

    Advanced Member

  • Members
  • PipPipPip
  • 36 posts
  • LocationMontgomery County, MD

Posted 01 September 2023 - 12:48 PM

BUILDING OPTION (PART 3) BUILDING OPTION GROUPS

This level is a bit more complex but very useful. It combines your sorting and options that overlap. In this example, I have a building option for a standard 3 bedroom and an optional 4 bedroom as well as an option for side wall in siding or brick at the ground floor (affects the positioning of my side wall at the 2nd floor). In this case, you insert your Building Options within the Group. You'll see that the group and its color expands with the Options. This way, when you check or uncheck the box beside the Group title, all the boxes for visibility for the Building Options within this group will turn on or off.

As you can see, the Building Option "Std 2nd floor" appears in the "Side siding-3 bedroom" group as well as "Side brick-3 bedroom" group because it can be active in one or the other. This differs from Building Options in 2014 or Simple Building Options where you insert it in only one option.
In the "Side siding-3 bedroom" and "Side brick-3 bedroom" example, the window in the Loft/Tech Area is programmed in one "Std 2nd floor" option for the "Side siding" and in another for the "Side brick" because its appears in one or the other.

In the "Side brick-4 bedroom" example, the window in the Bedroom #2 is programmed to be in the "Opt. 2nd floor" for both the "Side brick-4 bedroom" and "Side siding-4 bedroom" because that window is in a wall that's on the "Default Building Option" compared to the window in the previous example that's in a wall that's on one Building Option or another.

It takes a little getting use to but once you get the concept, it's a nice option. Hope it can help someone ;o)

Very helpful info here, but, how do you insert one building option into two or more different groups?  Is it actually the same building option or is it a new building option just named the same under the new group?  Do you have to go and assign all of the elements to the 2nd, similarly named building option or is there a way to just duplicate the one option into the new group so you are only editing one building option and the changes show up in both groups?  Thanks.


0 user(s) are reading this topic

0 members, 0 guests, 0 anonymous users