atta boy brian,
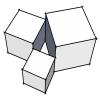
I really love the looks of this dormer,
does IT have a name ?
if not, lets give it a name.
Ogee Eyebrow Gable


Advanced Member

Posted 14 March 2017 - 07:28 PM
Sorry for the delay...was away for a while. Moving on. Keep in mind, this is a hybrid dormer drawing process, as Softplan does not have a "1 click" edit for it. Phase 1 creates a gable end profile, represented by the facia (so leave that on!) and phase 2 fills in the actual roof surface using roof planes, which are merely triangular solids, manipulated in space, and fortunately attach to other roof planes.
As I said, I keep a 3d window open as I draw, and check it constantly, turning material visibilities on and off as needed to get up close visuals for accuracy.
Step 2. Build a dormer on the main roof (vaulted in this case). It will probably set it on the main rafters, but I moved mine down to main wall, and set wall heights to 7'4". place your windows, and edit the header to a 12" glulam. Disregard the roof at this point, as we will be erasing and replacing it.
Step 3. After erasing roof, cut hole in main roof all the way to the peak, and adjust main rafters down to dormer wall, out of dormer space. Draw a sloped beam from peak of main roof to top of dormer wall, and center it. I made beams ends plumb, and made projection zero. Tip: Keep a repeat edit icon on your toolbar, so that when you work on an item, you can quickly copy it with edits done. It should look like this, except I haven't adjusted main rafters yet in this pic. 
Step 4. Once your beam is correct, copy and place them at chosen interval. Working off of the photo at the beginning of this topic, I put one at each outside of window far enough past so that the header has (2) studs to sit on, then one more centered between each side, for a total of five. Later, we will add intermediate rafters which will not extend past wall. Now adjust beam end heights, per pic, to achieve the required profile. Again just guessing, but they can and will be readjusted at a later time. Notice that I raised the center beam up, left the next one alone(the only one actually bearing on the header) and dropped the outer one down. The end of the header will actually be butted up to side of that beam. 
Step 5. Go into drawing settings and set pitch to something shallow, 3 or 4", and set overhang to 4'. Put a roof on your dormer walls, with a gable front edited to a 1' overhang. (that is what it looks like to me, anyway). It could look like this, although I think I may have generated it at a steeper pitch, then edited it to 3", because I had not yet reset the default.  Anyway, this roof position in vertical space is now controlled by heel height adjustments. Now comes the fun part.
Step 5. Create the profile. Not just a simple shape, the only way to do this is draw spline. You will try to create the shape you see in the photo at as close as possible to actual size using the counter and measuring info. It will can be adjusted later, but closer is better. When you get it close, hit edit and "change to shape", I think. It will then be a separate drawing. Go go to system library, find roof profiles, surround your masterpiece with a box and click. Name it, save etc. I think this is all in help if I have missed something.
Anyway go back to your drawing and edit the edge to profile, then pick your recently created from the list and edit it. Default values for profile height and width are 12". don't know why. They need to be in the neighbor of the size of your dormer, so start with 75" or so height, and 110" or so width. Overhang should be at the 48" that you set earlier. Uncheck "gable end provided by roof" and "soffit" . Change material, I picked copper. Make the heel height NEGATIVE rough height, and then hit bingo. Check your 3d drawing, and the edge that your edited should drop down to somewhere near to the main roof. Repeat for opposite edge. Now mess with those values in edge edit, including pitch, until your facia matches up to your beams ends. Pack a lunch, cause every adjustment, including pitch edit, affects every other value, and moves the entire "facia" half. Here is my current effort.  (will fix walls later) With a little practice, you can get this precise.
  Shown is an earlier effort, with beams left pround to show location, with roof planes, added in phase two.
Good luck.
Advanced Member

Posted 14 March 2017 - 08:48 PM
Harlon G. " Buddy " Suttle
casekc49@gmail.com
CELL: 913-339-6242
Advanced Member
Posted 14 March 2017 - 08:53 PM

Harlon G. " Buddy " Suttle
casekc49@gmail.com
CELL: 913-339-6242
Advanced Member
Posted 14 March 2017 - 09:00 PM
Harlon G. " Buddy " Suttle
casekc49@gmail.com
CELL: 913-339-6242
Advanced Member

Posted 14 March 2017 - 09:08 PM
brian,
didn't read all the threads for this project so might of missed seeing if you did one important step
and that is drawing a profile for the left and right hips of the dormer.
note:
I not sure that would of worked for this dormer since i've never done one.
Note 2:
if you didn't draw a profile for this roof, you might want to go back and try it.
i'm not sure if that would of made things any easier for you.
you really did a great job,
atta boy
wait a minute,
I somehow missed your latest threads or it seems this is a 2nd thread on the subject.
way above the call of duty.
thanks from all of us.
randy
v10 to future 2016+ 
Advanced Member
Posted 14 March 2017 - 09:10 PM
Harlon G. " Buddy " Suttle
casekc49@gmail.com
CELL: 913-339-6242
Advanced Member
Posted 15 March 2017 - 10:28 AM
One more, but there are lots more from the google search....
Those are both fine pics, but neither one is a shed dormer, running from dormer to main roof ridge, with the eve diving into the main roof at the bottom. My tutorial was as much about getting softplan to draw it as about it's construction. It's also not done yet, just got tired yesterday. I never thought to google it, going to do that now, thanks!
Advanced Member
Posted 15 March 2017 - 10:53 AM
In my review of the google images, came across a supplier of complex roof items...
http://www.digiconsoo.com
Hope this helps
I just checked out that link. Cool stuff, and spendy! Went through their gallery, but still didn't see one exactly like the one I am drawing, although I am sure they could do it. Thanks for the link.
Advanced Member
Posted 15 March 2017 - 11:04 AM
brian,
didn't read all the threads for this project so might of missed seeing if you did one important step
and that is drawing a profile for the left and right hips of the dormer.
note:
I not sure that would of worked for this dormer since i've never done one.
Note 2:
if you didn't draw a profile for this roof, you might want to go back and try it.
i'm not sure if that would of made things any easier for you.
you really did a great job,
atta boy
wait a minute,
I somehow missed your latest threads or it seems this is a 2nd thread on the subject.
way above the call of duty.
thanks from all of us.
Yeah, it is in multiple threads because it is kinda lengthy. As you did see, I included the step of making the profile, but didn't go into much detailed description of using spline to create it. Having never done it before, it took a bit of trial and error to come up with one that worked well. I did miss a step, however, involving those side walls that the roof edge references to. Will mention it in phase 2 tutorial, at a later date.
Advanced Member
Posted 15 March 2017 - 11:25 AM
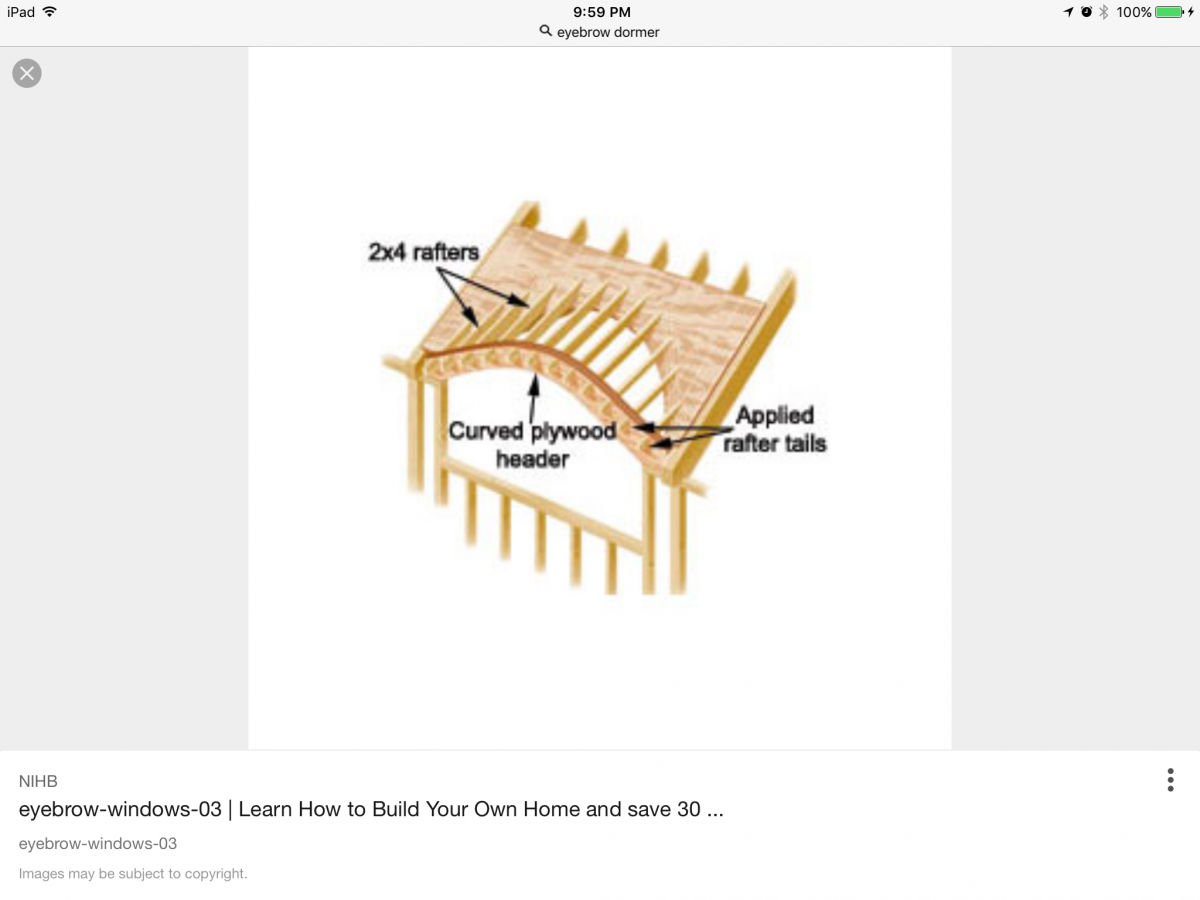
The name for this dormer is "EYEBROW" and do a google search for images and there are some drawings for the layout and construction.....
As I mentioned, the name of the dormer that you pictured is "eyebrow", but the one that I am drawing would be described as "eyebrow shed roof with ogee eve which dies into main roof at the bottom and fades into roof ridge", or something like that. Two entirely different critters. Also, as I mentioned in my earlier post, it is not something that I dreamed up, but is something that someone gave me a photo of and wanted me to reproduce it as exactly as I can. I do appreciate the feedback. This forum is a great source of info.
Advanced Member
Posted 18 March 2017 - 12:29 PM
Harlon G. " Buddy " Suttle
casekc49@gmail.com
CELL: 913-339-6242
Advanced Member

Posted 18 March 2017 - 12:51 PM
The picture in post #1 is the one he is trying to duplicate ...
Advanced Member
Posted 18 March 2017 - 01:21 PM
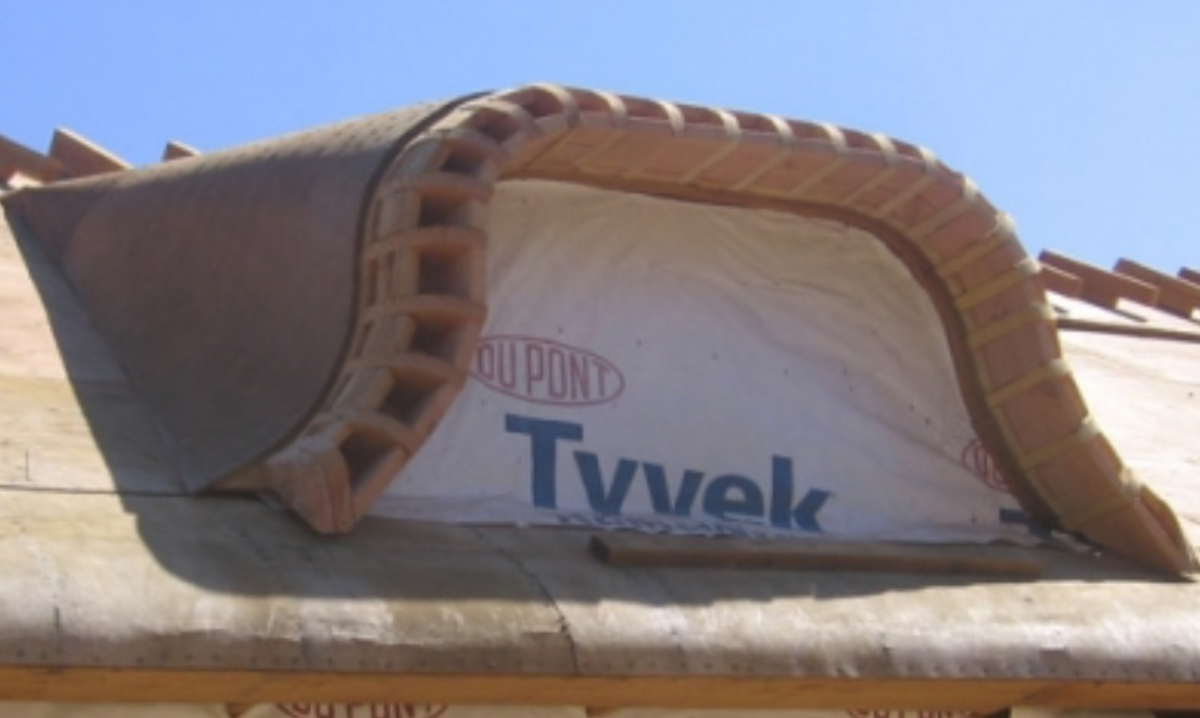
Here is a pic that is a bit clouser to what you describe....
IMG_0880.PNG
Yep, much closer. I wonder what material they used as "sheathing". I have been trying to design them to be build-able. If those radii become too tight, sheathing is out, but whatever is used in that pic is curved pretty tight. The roofing material itself will limit the radius, and, I guess, vice-versa. I did google "shed eyebrow dormer", and found a few great examples, but most were much shallower. It looks very much to be a thatch inspired style, but saw some with small tile roofing. Thanks for the pic...I hadn't seen that one.
Advanced Member
Posted 22 March 2017 - 05:11 PM
Before I try to finish off the dormer, does anyone know what that material is on the roof in Harlon's last post? Tight curve! Moving on.
Reminder: this is me using softplan to draw a dormer that doesn't have a 1-click method, so it is only meant to get close.
First, a small correction to the earlier post, go ahead and leave your front wall on the roof, instead of dropping it down. The reason for that is that at some point after you get your front wall drawn, and extended out to the point where your facia dives in to your main roof, you will need to hit "fit wall to roof". If your wall originates below the main roof, then it will pick that to fit to, instead of your curved roof and you will end up with a very short flat front wall.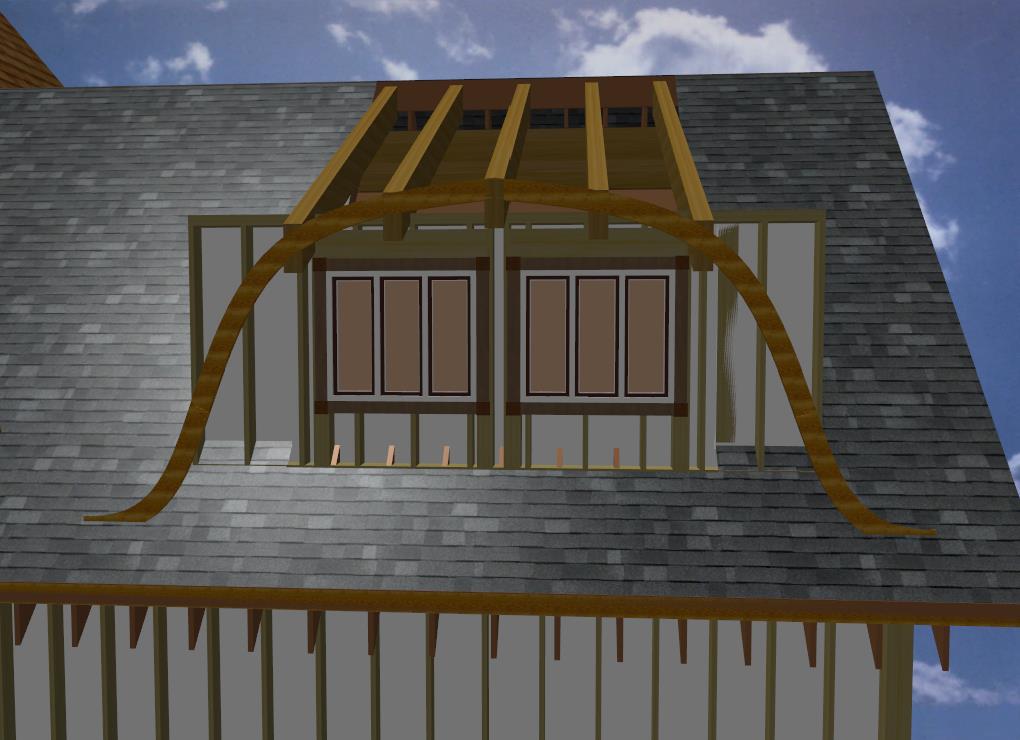 after fit to roof
  I have obviously turned off some materials for visibility.
Here is a pic from the side.
The side wall that is still sticking up through the curved roof is the wall that the roof edge is referenced to, and moving them farther apart is the only way to widen the roof of your dormer. If you don't want the interior of your dormer--the space you will see from inside-- to be as wide as the points where it dives into roof, then you will have to draw new interior wall-on-roof walls at whatever width you want later on.
Now you will start to add roof planes, which are merely triangular solids, and which fortunately attach themselves to adjoining existing roof planes. Be precise by zooming in. Start with the main center panel, which stretches from side to side at the ridge and to the center point at the end of the center beam. The remaining triangles will be smaller, and obviously, when the curves get tight, you want to keep the widths narrower to more approximate a gentle curve. I count contour lines to keep things symmetrical. When done, should look like this. 
While on the subject of contour lines, notice that the curved shape with the lines in it is an actual 3-d solid, and if you go inside your structure, you will see it sticking into the room. If this is a true false dormer, then no worries. But, if you want it to be open, then you need to get rid of it. The only part that needs to remain is the part from the outside overhang to the inside of the front dormer wall. This part:
The way to get there is to edit the clear "intersect" reference circle and change it to vertical. Then grab the inside of that little 1' strip that is left, and drag it to a point just inside the front wall. When done correctly, you will even get a fairly good representation of an interior view, as if it had a wood ceiling. If you really want to get close, you can take the roof planes that show on the inside, and change the thickness from 3/4" to say 13", which will make them extend below the bottom of the beams inside. I was unable to actually place a ceiling that matches that actual shape, but this doesn't look bad. 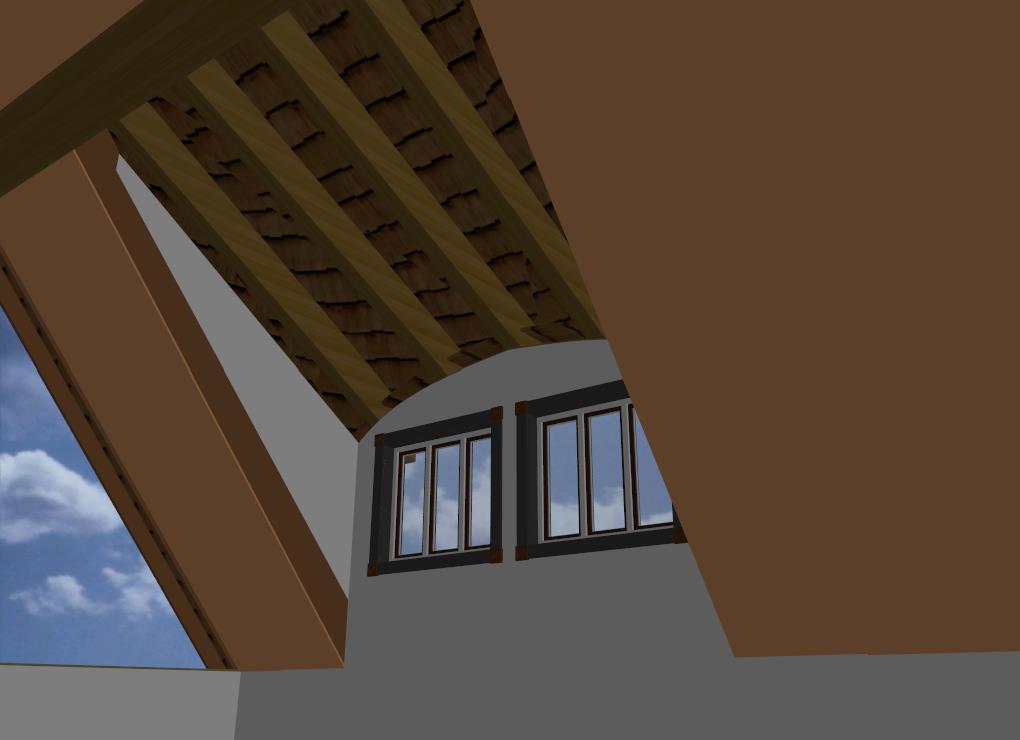
Now I am going to jump over to the dormer with a floor under it to show the final steps. That is blocking and side rafters. The structure gets it's strength and support from the beams, but whatever forms the sheathing needs additional support and something to attach the curved sheathing (strips?) and ceiling to. One could use intermediate rafters, but I thought cross blocking would be best, in combination with beveled plates on those beams. Someone will be wearing out a bandsaw or jigsaw, and power planer to carve the curve into the blocking and side rafters, but I see no other way.  The rafters shown will be setting on a wide plate on main roof and hung from side wall, with curve carved in. I didn't draw that, but here is a pic showing what actually would be cut away still showing through roof.
Have fun. And not to hijack my own thread again, but is there a consensus on the better/easier method of ridge beam location? Rafters hung from side, or rafters set on beveled plate on top? I have seen and drawn them both ways, but locals seem to prefer rafters on top.
Advanced Member
Posted 22 March 2017 - 06:16 PM
Before I try to finish off the dormer, does anyone know what that material is on the roof in Harlon's last post?
Looking at the way it's nailed along the fascia, I'd say that it was a sheet metal.
Advanced Member
Posted 22 March 2017 - 06:38 PM
Looking at the way it's nailed along the fascia, I'd say that it was a sheet metal.
But if you look at the exposed edge up on the dormer, it seems to have a thickness, like sheathing, but no way would any wood products of sheathing thickness make that bend. Never seen anything like it, wondering if there is a new product.
Advanced Member
Posted 23 March 2017 - 11:47 AM
Here is a link to the company that framed the eyebrow dormer in question....sorry I should have followed up with this when I found that pic.
http://www.srfreemaninc.com/contact/
Harlon G. " Buddy " Suttle
casekc49@gmail.com
CELL: 913-339-6242
0 members, 0 guests, 0 anonymous users

