
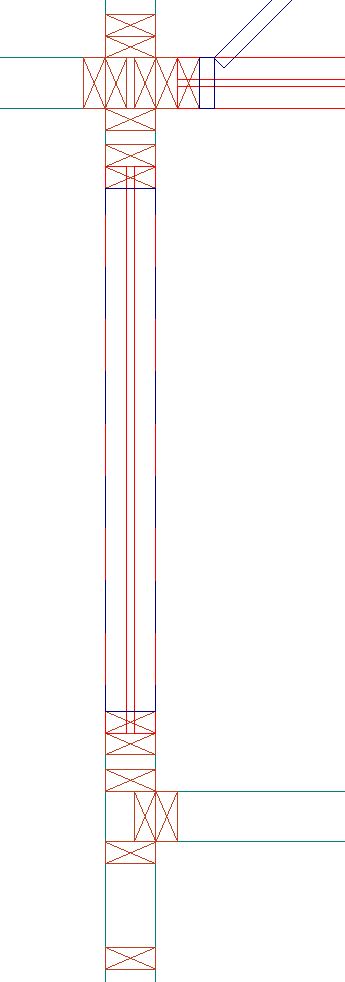
This may have been addressed before; I did a quick search through the forums but did not find what I was looking for. Is there a way to get the opening trim lines to actually print? For example, when you turn on trim in the drawing, it defaults to show as a red dashed line. However, on the sheet sets and when printing, these lines are not visible and do not print. I have gone through system settings and played around with different options in an attempt to make it work, but I cannot seem to find the correct one. Does anyone know how to make this work?

Show Opening Trim Lines On Prints
Started by
David Johnson
, Oct 28 2021 11:40 AM
10 replies to this topic
#1

David Johnson
-
- Members
-

- 74 posts
Advanced Member
- LocationSioux Falls, SD


#2
David Zawadzki
-

- Members
-
- 658 posts
Boss
- LocationBoise, Idaho
Posted 28 October 2021 - 12:35 PM
Why do you need that?
Award winning Design+Builder with over 40 years of construction experience. Homes built in Michigan, Utah and Idaho. Construction projects in CA, AZ, NV, ID, UT, NE, MO, NM, FL, GA, NY, and MI.
https://idahocustomhomes.weebly.com/
Twinmotion 2024, Autocad, SoftPlan 2024, Solidbuilder, Chief Architect X15, Sketchup, 3D Home Architect, etc.
CyberPowerPC Syber Forti SFG9EX Gaming Desktop Computer, Intel Core i9-9900K 3.6GHz, 32GB RAM, 3TB HDD + 1TB SSD, NVIDIA GeForce RTX 3070 10GB, Windows 10 Pro
.Disclaimer: I'm not saying I'm Superman. All I am saying is no one has seen Superman and me in the same room together.<p><p>
Softplan user since 1989
#3
David Johnson
-
- Members
-
- 74 posts
Advanced Member
- LocationSioux Falls, SD
Posted 28 October 2021 - 12:54 PM
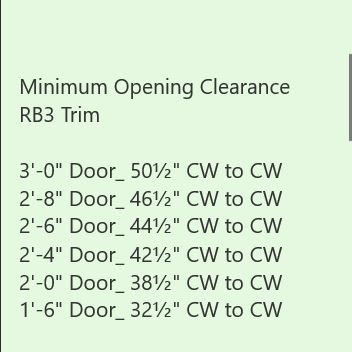
My boss wants to be able to show the widths of the door times, especially since we tend to use very wide custom trims on a regular basis. Seeing it on printed plan sets will also allow the customers to have some kind of visual to see how close trim pieces get to the corners, cabinets, etc...

#5
David Johnson
-
- Members
-
- 74 posts
Advanced Member
- LocationSioux Falls, SD
Posted 28 October 2021 - 03:42 PM
It's really more of a visual thing, not a verification of clearances thing. It's just one of those details that would be nice to show on the plans if possible, although it seems to not be an option at this time.


#9
Charles Vienne
-

- Members
-
- 1 posts
Newbie
Posted 30 October 2021 - 12:43 PM
David,
I am still using a much older version, but have you tried:
File > > > > Drawing Options > > > > Material Options > > > > Opening Options > > > >Sill:
Sill Thickness
Sill Overhang
Obviously you would have to make door sill(s) visible and of course it only displays on one side.
But possibly that would suffice at least for now.
Charlie
Edited: to add image


#11
Jon Davis
-

- Members
-
- 541 posts
Advanced Member
Posted 02 November 2021 - 07:48 AM
I know you can turn them on and off visually in the drawing, but as others have mentioned I've yet to find a way to make them print. I have set them to the correct size though, so that when placing doors near corners or two doors close to each other, I can visually tell if there's room enough for the trim.
0 user(s) are reading this topic
0 members, 0 guests, 0 anonymous users

