Jump to content


Photo

False Gable / Frieze


  • Please log in to reply
21 replies to this topic

#1 Dennis Swihart

Dennis Swihart

    Advanced Member

  • Members
  • PipPipPip
  • 36 posts
  • LocationMontgomery County, MD

Posted 26 December 2023 - 07:50 PM

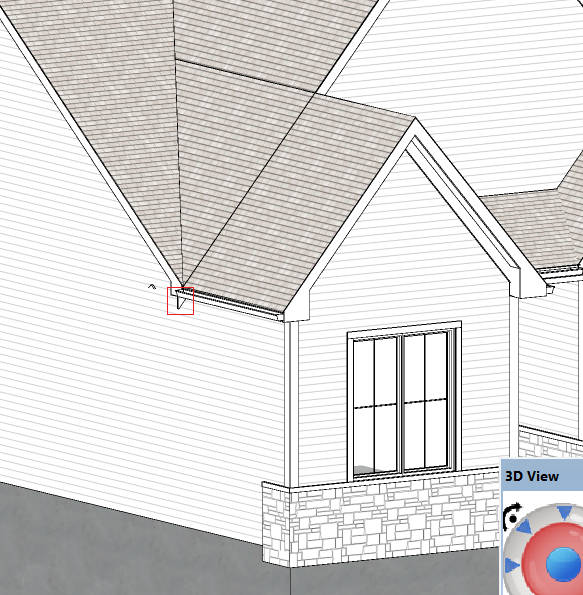
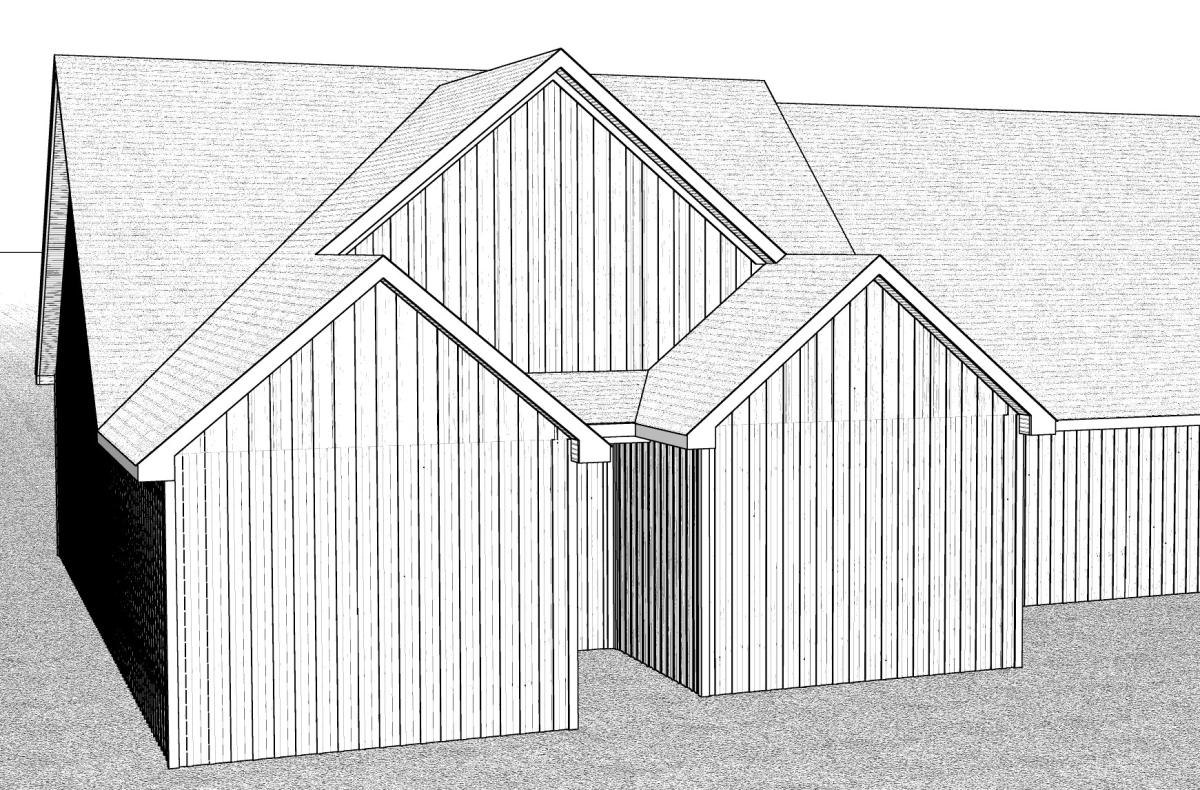
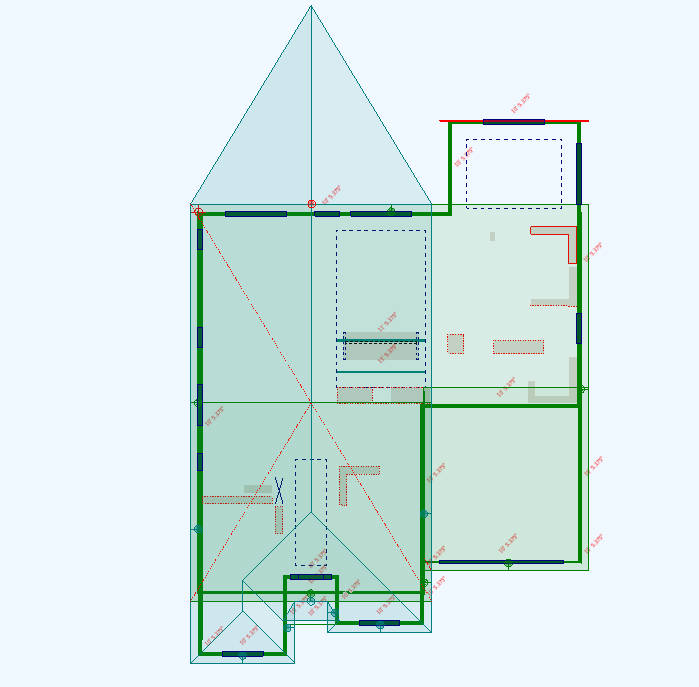
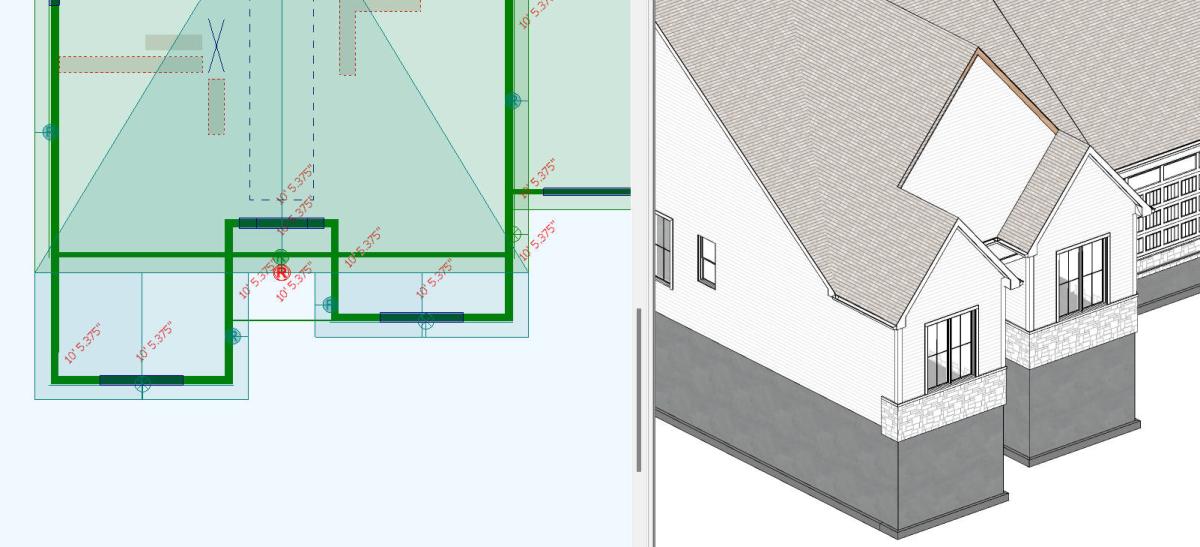
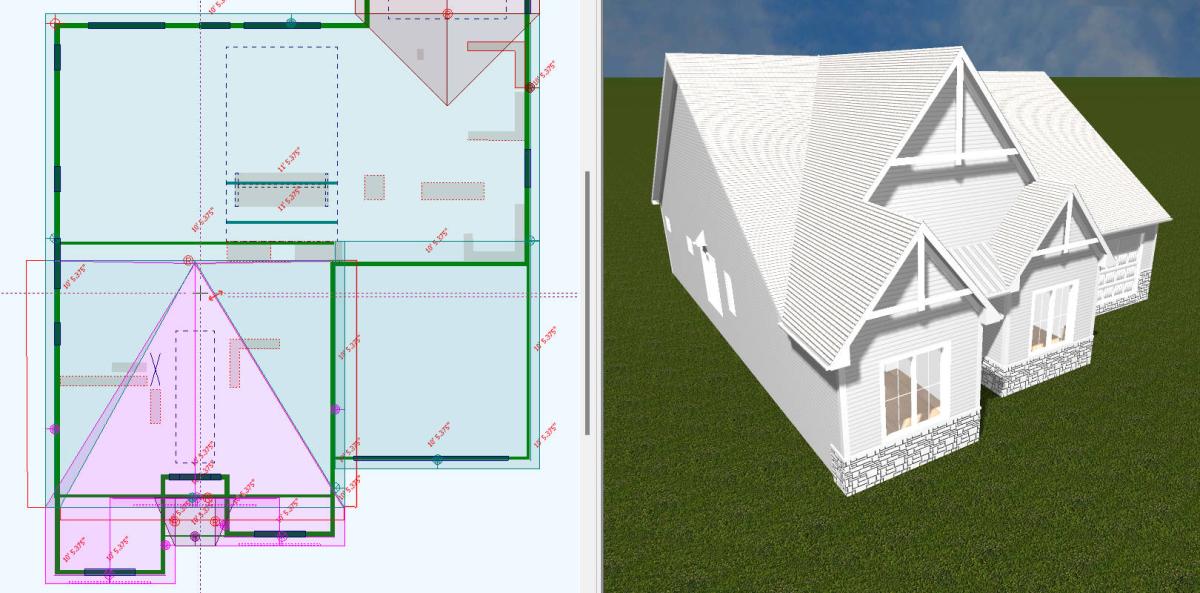
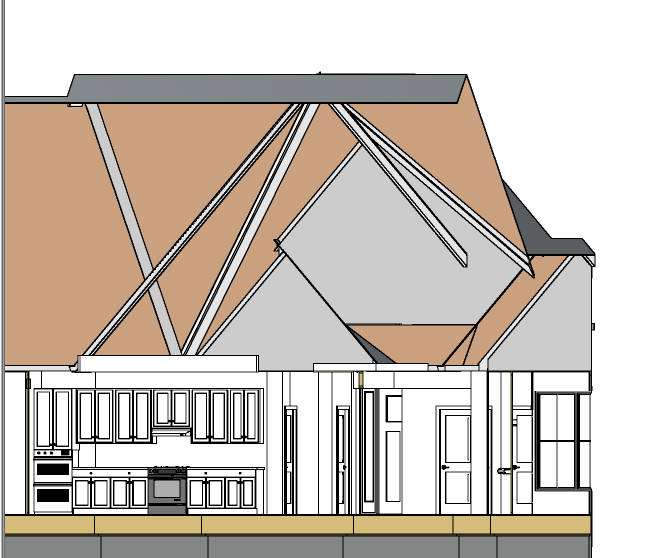
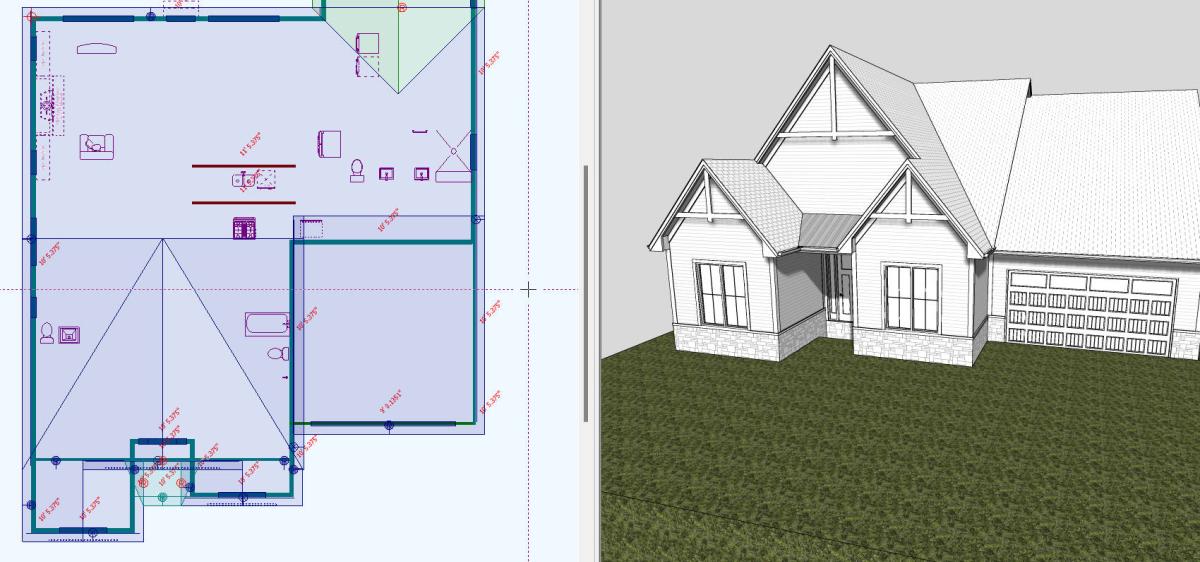
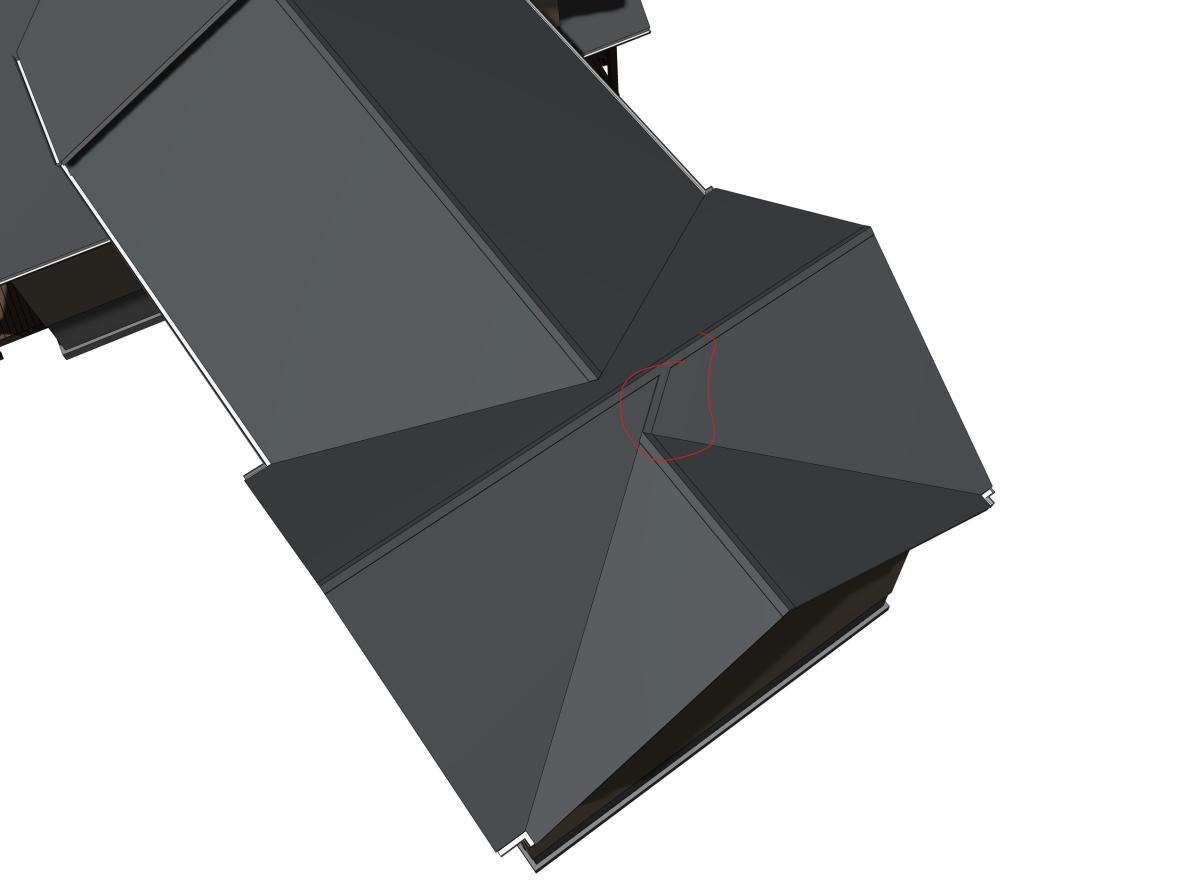
Hello - I'm trying to figure out how to keep the gable frieze shown in the images below from extending below the soffit.  


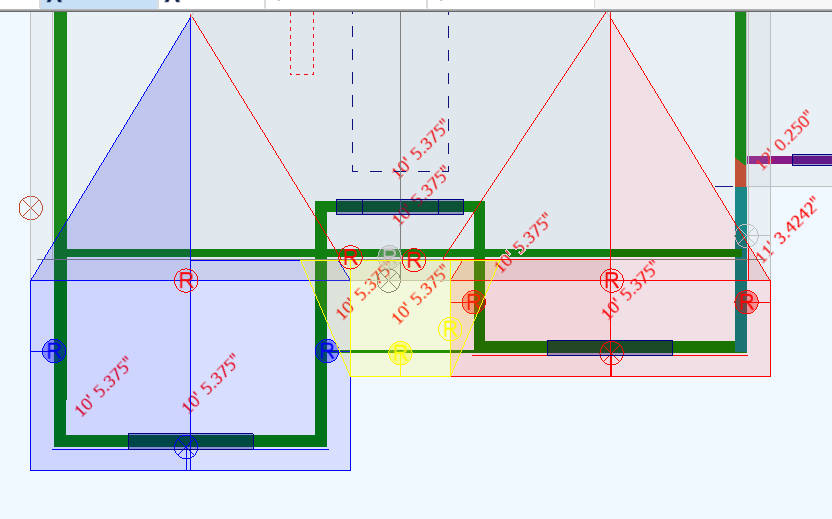
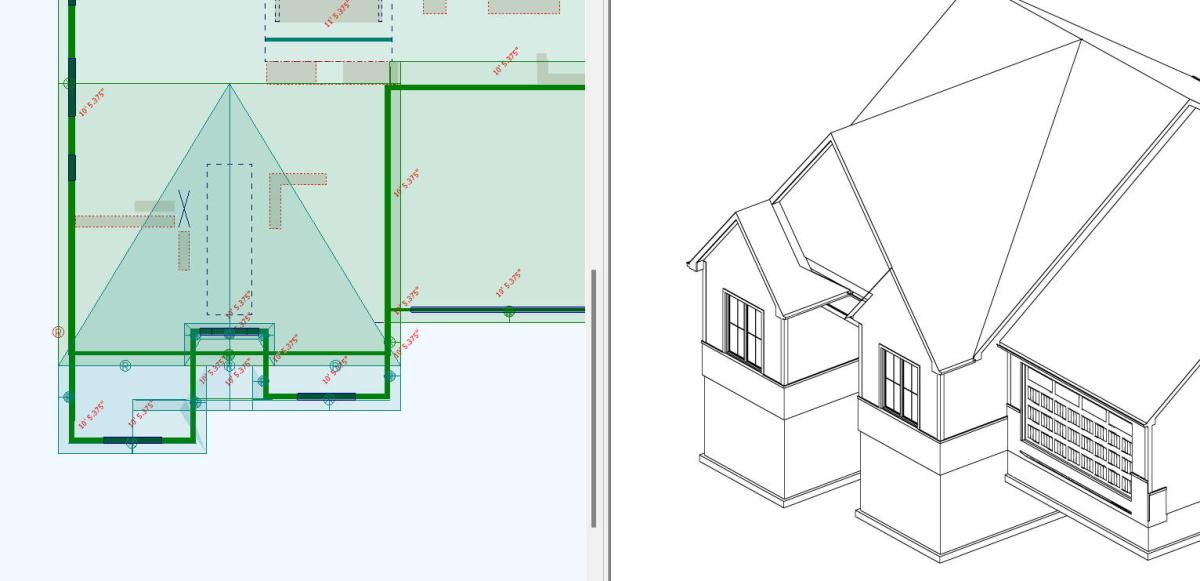
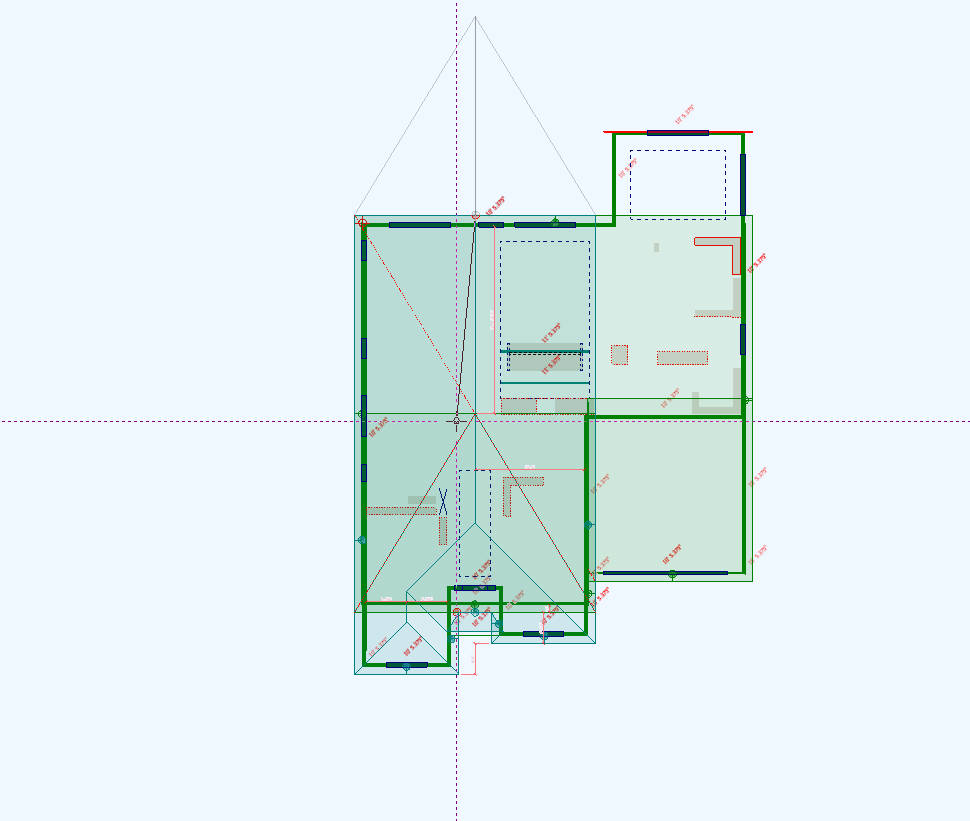
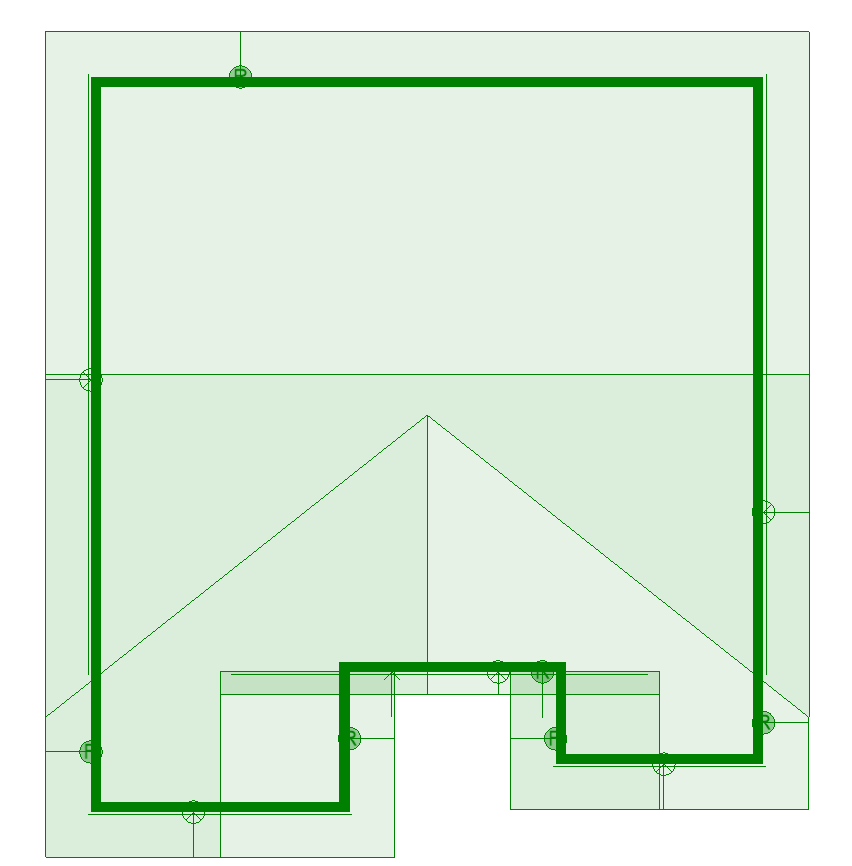
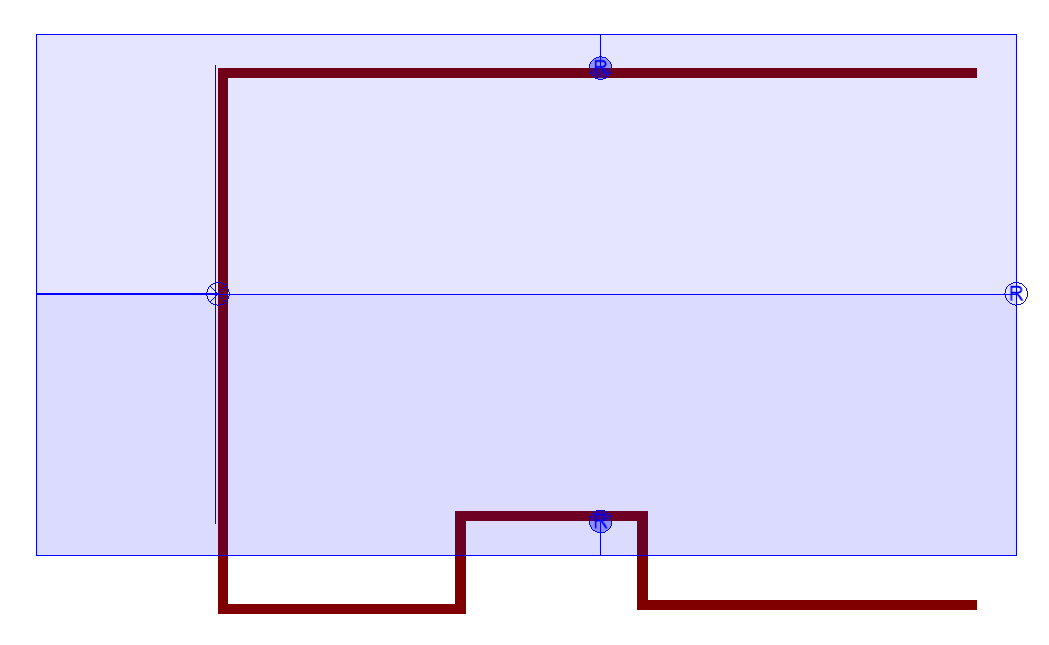
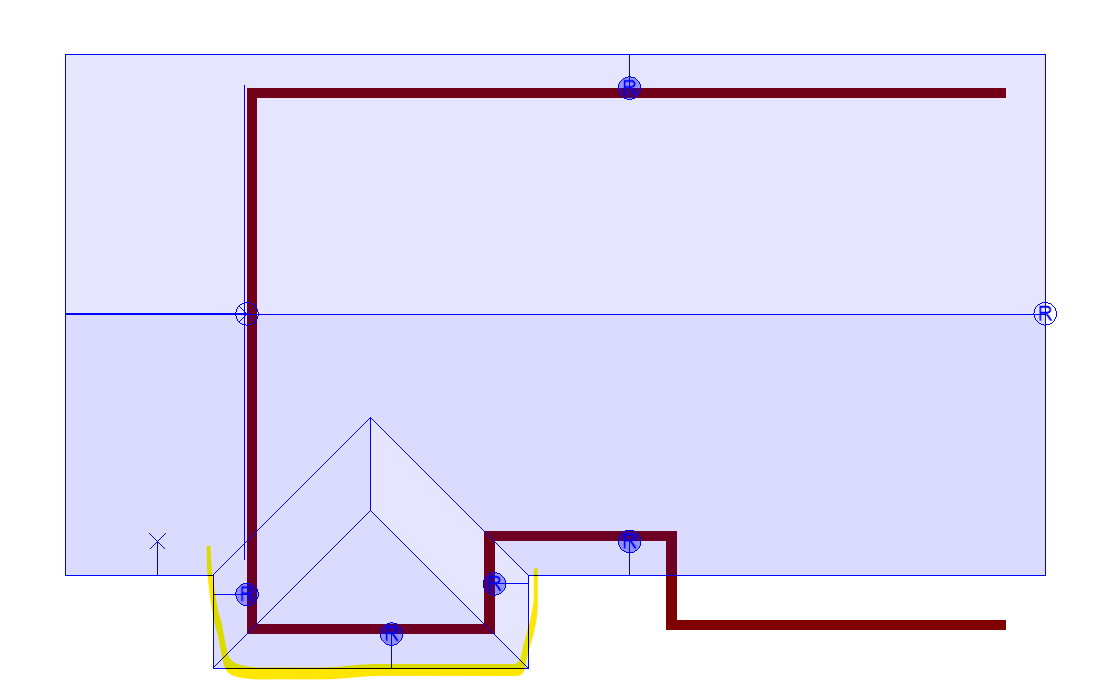
The Axonometric file below shows the general configuration I have and it's correct for what I need.  I don't know that I built it in the best way.  The basic process was:


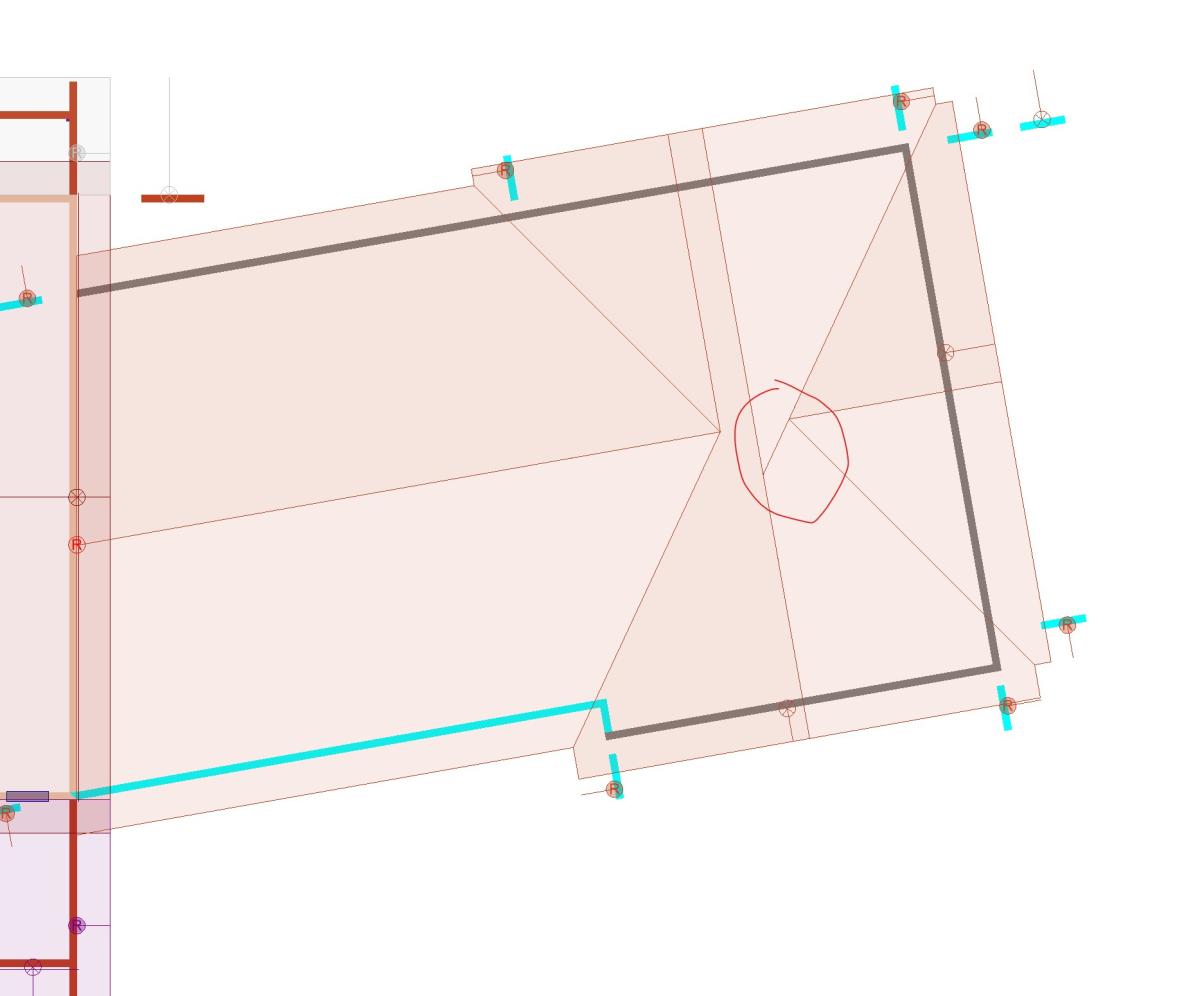
1. Build the main gable roof at 8.5:12 pitch.

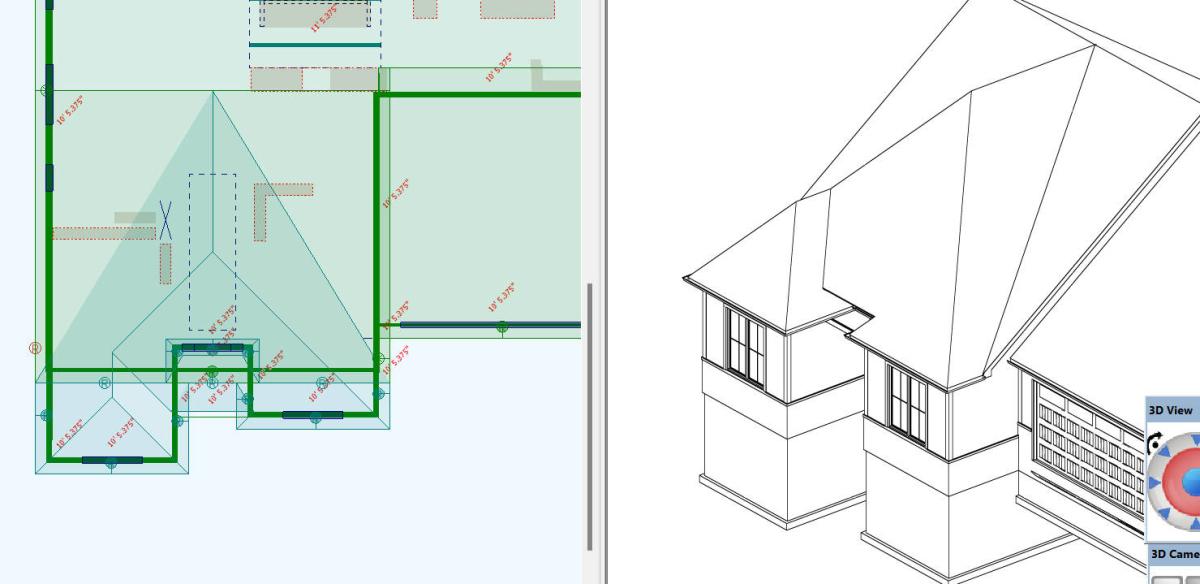
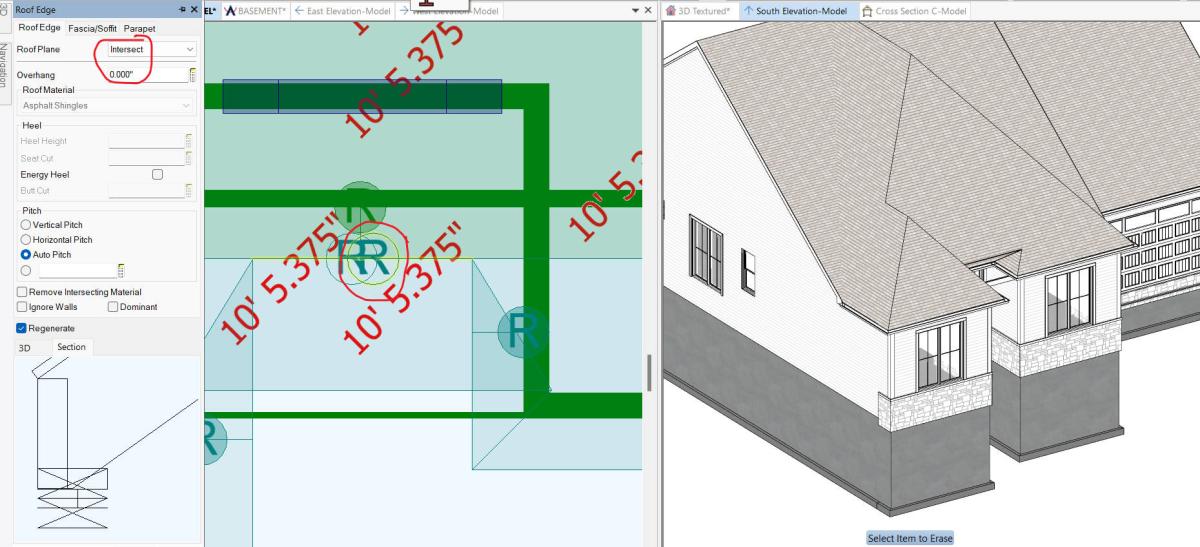
2. The big false gable in the front is supported by a girder truss in real life (I'm recreating a house that has already been built).  Since I can't support on a gable truss in SP, I've created a load bearing wall type that is used like a beam for the false gable to be supported on.  It's only 1/4" tall, since I want to hide it in the gyp bd ceiling.

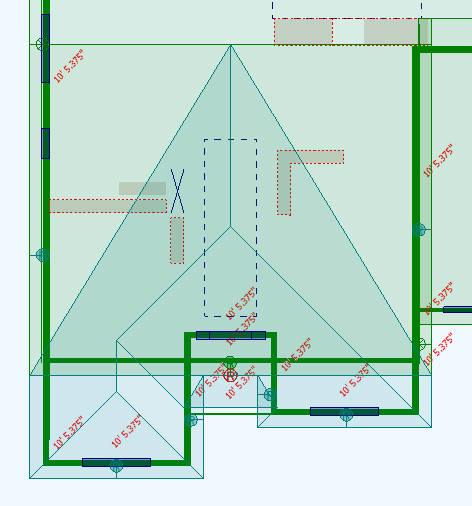
3. I drew the false gable at 14:12 pitch

4. I built the 2 smaller front-facing gables with the trace roof command.

5. I added the shed roof in a similar manner.

6. I set the smaller gables to remove intersecting material (the face of the false gable within the roof.

7. I cut a hole in each of the small gables to eliminate the roof that was going into the false gable, so the inside would look right.  I'm planning to add trusses for a semi-decent section view.


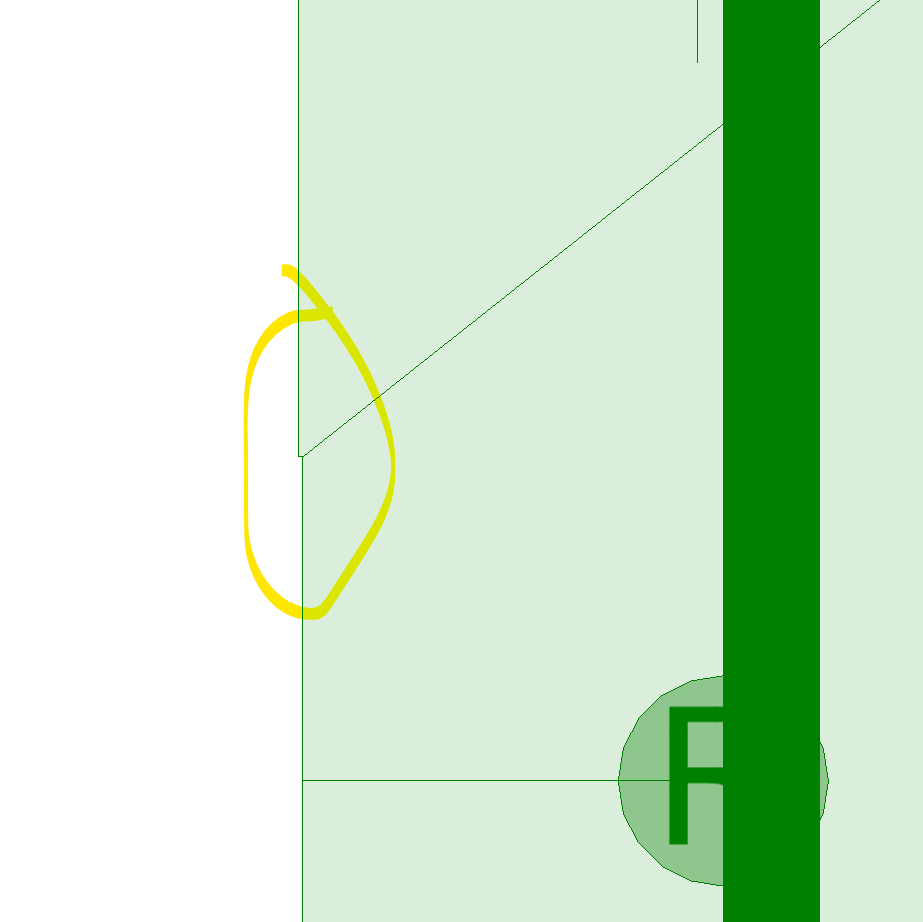
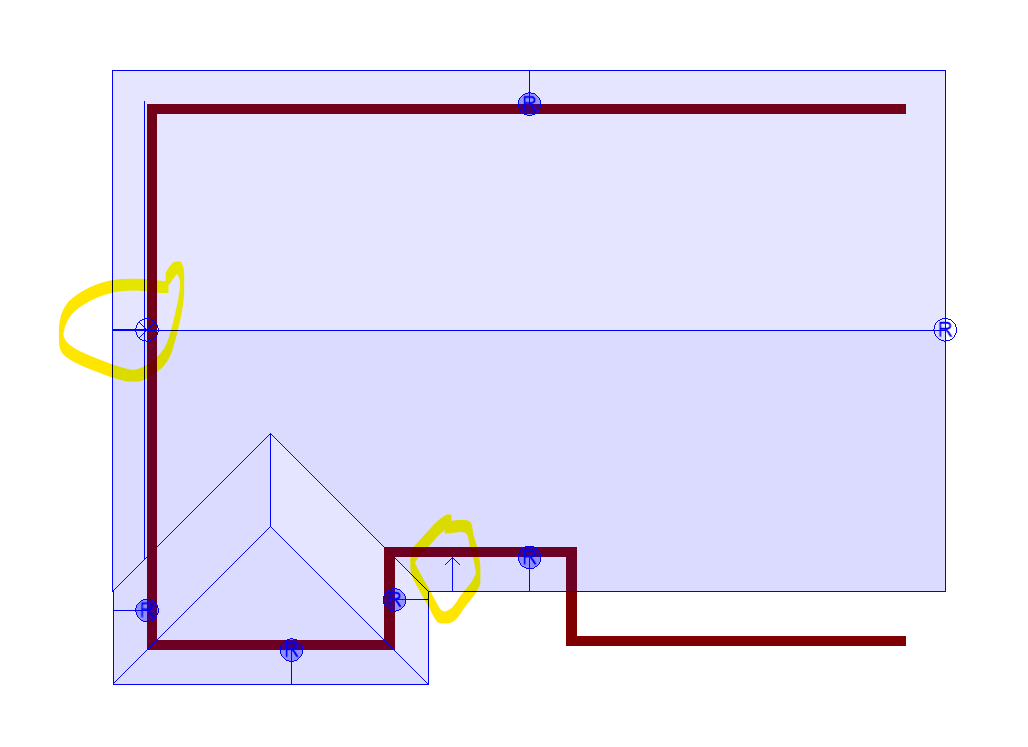
So, I was pretty proud of myself for figuring out how to do all that (I'm a newbie).  However, I can't figure out how to delete the fascia and frieze of the false gable where they are buried in the attic space.  I could possibly live with that, but for some reason, the gable frieze of the false gable is projecting beyond the bottom of the soffit. You'll see other issues if you look closely, but I'll leave those for another day.


I'm not sure if my whole approach is wrong of it there is just some minor thing I am missing.  Any help would be much appreciated.


Attached Thumbnails

  • axonometrix.jpg
  • gable Frieze 1.jpg
  • gable frieze 2.jpg
  • main level plan.jpg
  • roof plan.jpg


#2 Dennis Swihart

Dennis Swihart

    Advanced Member

  • Members
  • PipPipPip
  • 36 posts
  • LocationMontgomery County, MD

Posted 26 December 2023 - 08:11 PM

As a follow-up to my post above, Is it generally possible to get rid of all the coplanar lines that show on the roof plan where they wouldn't exist in reality?  I'm trying to make live elevations because I have multiple different options and elevation types and custom drawings for each one is not really workable.  If I show Sillhouettes, the coplanar lines go away, but so do some of my non-coplanar lines.  I'm trying to use a textured view so that all of my siding can be a texture.  Is there any way to get this to work?    Thanks again.


#3 Richard Rubinski

Richard Rubinski

    Advanced Member

  • Members
  • PipPipPip
  • 611 posts
  • LocationWarner Robins, GA.

Posted 27 December 2023 - 08:30 AM

Trace the false gable and the other two gables as one roof, then you can add a shed roof in the center.

#4 Dennis Swihart

Dennis Swihart

    Advanced Member

  • Members
  • PipPipPip
  • 36 posts
  • LocationMontgomery County, MD

Posted 27 December 2023 - 08:30 PM

Thanks.  I can't really figure out how to do what I think you're saying to do.  If I trace the false gable and other 2 gables as a single roof, I get the screen shots below.  I need the false gable to be set back from both of the smaller gables and it seems attach to that front wall only.  I'm not really sure what's going on.  I'm not sure where to do that trace to get the right effect.  I haven't spent a ton of time trying to figure it out yet, but is this generally the approach you had in mind?

Attached Thumbnails

  • trace gables.jpg
  • apply gables.jpg


#5 Richard Rubinski

Richard Rubinski

    Advanced Member

  • Members
  • PipPipPip
  • 611 posts
  • LocationWarner Robins, GA.

Posted 28 December 2023 - 09:07 AM

Thanks.  I can't really figure out how to do what I think you're saying to do.  If I trace the false gable and other 2 gables as a single roof, I get the screen shots below.  I need the false gable to be set back from both of the smaller gables and it seems attach to that front wall only.  I'm not really sure what's going on.  I'm not sure where to do that trace to get the right effect.  I haven't spent a ton of time trying to figure it out yet, but is this generally the approach you had in mind?

Make the overhang less on your center lollipop. Looks like you have it to match the gable overhang on the rightside gable.

Attached Thumbnails

  • 1-roof-1.jpg
  • 1-Roof.jpg
  • 1-elevation.jpg


#6 Dennis Swihart

Dennis Swihart

    Advanced Member

  • Members
  • PipPipPip
  • 36 posts
  • LocationMontgomery County, MD

Posted 29 December 2023 - 09:30 AM

That's encouraging.  I can't quite replicate it though.  My roof is a little different than what you show.  The wall with the door in it does not relate to any part of the roof.  Could you please look at the trace path I've attached and let me know if it is correct?  The main gable is referencing the same beam for the front and back edges.  


I'm going to follow this post with another showing a 2nd path that gives a similar result.  Can you let me know if that one is a better way to do it?


Also, what are the lollipops with "X"'s in them?  And what does a red lollipop mean?


Thank you.

Attached Thumbnails

  • Trace path 1 - result.jpg
  • Trace Path 1.jpg


#7 Dennis Swihart

Dennis Swihart

    Advanced Member

  • Members
  • PipPipPip
  • 36 posts
  • LocationMontgomery County, MD

Posted 29 December 2023 - 09:35 AM

As mentioned in my post above - Here is the 2nd trace path and the edits I made to it. Is this how you woudl approach it?

Attached Thumbnails

  • trace path 2 after moving lollipop.jpg
  • trace path 2 - move lollipop.jpg
  • trace path 2 result.jpg
  • trace path 2.jpg


#8 Richard Rubinski

Richard Rubinski

    Advanced Member

  • Members
  • PipPipPip
  • 611 posts
  • LocationWarner Robins, GA.

Posted 29 December 2023 - 01:03 PM

This section describes all of the reference points on a roof. When you add another roof section it will be in a different color. Do you want a another gable on the rightside like on the left?


Attached Thumbnails

  • Roof Display 2024.jpg


#9 Dennis Swihart

Dennis Swihart

    Advanced Member

  • Members
  • PipPipPip
  • 36 posts
  • LocationMontgomery County, MD

Posted 29 December 2023 - 07:29 PM

That's pretty helpful - thanks for pointing me to it.  I do want the other gable.  But I'm so confused by this issue that I was trying to break the problem down to see if I was doing the initial trace correctly - just as a starting point to decipher this. So, I hadn't done the gable in the image I sent.


Somehow, I was able to get the attached image.  Although, now I can't recall how I did it.  It seems to matter what order you apply the gables in and if you apply it to the individual edge or to the roof as a whole.As you can see, the problem is that the large gable has no overhang or fascia.  It won't let me change the depth of the overhang on that large gable at all.  I feel like I may need another wall or beam to reference to.  The middle area has an inverted roof from at the bottom of it when it is first created.  


I also don't understand what it means when a reference point is on a roof edge and not on a bearing wall.


At this point, I'm not sure what to ask.  I'll have to spend some more time with it.  If you happen to know of a good video that gets to these issues, please let me know.  I've watched all the ones that came with the program.  Maybe if I rewatch them now, I'll get more out of them.


Thanks for your help.

Attached Thumbnails

  • with gables.jpg


#10 Jeremy Plum

Jeremy Plum

    Advanced Member

  • Members
  • PipPipPip
  • 189 posts
  • LocationBishop, Ca.

Posted 30 December 2023 - 07:21 AM

just a $.02 thought...been following the conversation to see what I can learn. 


I like to keep the different roof sections on separate Building Options so I can control them individually and immediately see what ones are playing nice and what ones aren't. I apply different color to each also. This is especially handy when you go to generate roof framing anf trusses.


Some roofs are quite tricky but satisfying once you get them drawn.


Jeremy Plum

Plum Design & Construction


#11 Dennis Swihart

Dennis Swihart

    Advanced Member

  • Members
  • PipPipPip
  • 36 posts
  • LocationMontgomery County, MD

Posted 30 December 2023 - 02:45 PM

Thanks to everyone's ideas, I mostly figured out how I can do it.  For anyone who is interested, this is what I ended up doing:


Per Jeremy's idea, I put the main roof on a different option and turned it off. 


Then I made the front gables as a separate roof. 


A major part of the problem was that I only had one bearing edge for the center gable roof in my previous attempts. (You can see that in my earlier posts.)  This time I added a second hidden beam a little past the main roof's ridgeline to give it another bearing surface like a normal roof.  It formed perfectly when I traced it. 


Then I turned on the main roof option and moved it back to the default option.  I was able to relocate the lollipop on the new beam to meet the ridge line of the main roof.  That allowed me to delete the hidden beam I had just added.


From there, it was a lot of fiddling with the trace hole command to try to get it to look right.  I have a lot more to learn about that.  I got the outside looking good and now I'm trying to figure out how to get rid of the fascia and soffit on the inside of the roof.  I'm not sure why these end up along the cut edges to begin with.  I'm not sure but I think their presence is affected by exactly where you cut the hole.  In many parts of this process, I found that cutting right on a ridge, valley or roof edge, does not yield predictable results.  Soffits don't seem to miter properly and they were sticking out where they shouldn't.  I solved that by reworking the hole outline.

Attached Thumbnails

  • almost there.jpg
  • soffit fascia gutter inside.jpg


#12 Joseph Smith

Joseph Smith

    Advanced Member

  • Members
  • PipPipPip
  • 824 posts
  • LocationWI

Posted 09 January 2024 - 01:24 PM

Perhaps it was already discussed but could you make the main roof all one plane?  This could eliminate cutting holes and having strange roof connection lines showing on the 3d.  Cheating the gable end larger by a 1/4" or so then the hip end will allow this.

Attached Thumbnails

  • r1.png
  • r2.png

  • Steven Wohlgemuth likes this

Joseph A. Smith

http://granitedesigngroup.com


#13 David Zawadzki

David Zawadzki

    Boss

  • Members
  • PipPipPip
  • 663 posts
  • LocationBoise, Idaho

Posted 10 January 2024 - 01:03 PM

Here’s a recent video on doing complex roofs that may be of interest to some folks.

https://youtu.be/0Ds...E0xjvrKyMqogjPI
Award winning Design+Builder with over 40 years of construction experience. Homes built in Michigan, Utah and Idaho. Construction projects in CA, AZ, NV, ID, UT, NE, MO, NM, FL, GA, NY, and MI.

https://idahocustomhomes.weebly.com/

Twinmotion 2024, Autocad, SoftPlan 2024, Solidbuilder, Chief Architect X15, Sketchup, 3D Home Architect, etc.

CyberPowerPC Syber Forti SFG9EX Gaming Desktop Computer, Intel Core i9-9900K 3.6GHz, 32GB RAM, 3TB HDD + 1TB SSD, NVIDIA GeForce RTX 3070 10GB, Windows 10 Pro

.Disclaimer: I'm not saying I'm Superman. All I am saying is no one has seen Superman and me in the same room together.<p><p>

Softplan user since 1989

#14 Dennis Swihart

Dennis Swihart

    Advanced Member

  • Members
  • PipPipPip
  • 36 posts
  • LocationMontgomery County, MD

Posted 10 January 2024 - 08:06 PM

Perhaps it was already discussed but could you make the main roof all one plane?  This could eliminate cutting holes and having strange roof connection lines showing on the 3d.  Cheating the gable end larger by a 1/4" or so then the hip end will allow this.


That's sounds like a great idea, but I'm not sure how you actually did that.  Can you elaborate?  I tried drawing the main gable, extending the gable ends 1/4" and then using trace roof, add roof or add roof edges and nothing seems to work.  I don't know where to trace it exactly.  Are you able to do this as one roof somehow?  I can't figure out how to extend the gable 1/4" if it's all done as one roof.


BTW - I contacted SP support and they had me do the main roof as a dutch gable then add the smaller gables to that.  The shed roof I have in the center is actually the lower part of the dutch gable.  That works fairly well, but it's not really accurate when I cut a section.


#15 Joseph Smith

Joseph Smith

    Advanced Member

  • Members
  • PipPipPip
  • 824 posts
  • LocationWI

Posted 11 January 2024 - 11:31 AM

Dennis.


1.  Make the simple rectangular roof. increase the gable eave lollypop very large so out of the way for step 2

2. Insert Polygon Edge command to increate to your complex roof.  adjust your lollypops

3. change the gable eave back to your standard eave length + 1/4 inch or so.  Also move the front 'X' lollypop to the wall in the middle so it has a wall to connect to.


Attached Thumbnails

  • 1.png
  • 2.png
  • 3.png

Joseph A. Smith

http://granitedesigngroup.com


#16 Richard Rubinski

Richard Rubinski

    Advanced Member

  • Members
  • PipPipPip
  • 611 posts
  • LocationWarner Robins, GA.

Posted 11 January 2024 - 03:57 PM

Dennis.


1.  Make the simple rectangular roof. increase the gable eave lollypop very large so out of the way for step 2

2. Insert Polygon Edge command to increate to your complex roof.  adjust your lollypops

3. change the gable eave back to your standard eave length + 1/4 inch or so.  Also move the front 'X' lollypop to the wall in the middle so it has a wall to connect to.

Joseph, 1/32" will work so you can't see it from the Clubhouse.


  • Joseph Smith likes this

#17 Keith Almond

Keith Almond

    Advanced Member

  • Members
  • PipPipPip
  • 5,099 posts
  • LocationBrockville, Ontario, Canada

Posted 11 January 2024 - 04:11 PM

I usually use 1/32" (0.0313") too.


  • Joseph Smith likes this
Keith

There are 10 types of people in this world ....... Those who understand binary, and those who don't.

Softplan user since version 5.5.2.5

www.homehardwarekingston.ca

#18 Dennis Swihart

Dennis Swihart

    Advanced Member

  • Members
  • PipPipPip
  • 36 posts
  • LocationMontgomery County, MD

Posted 14 January 2024 - 05:30 PM

Thanks everyone. I got this working and I'm pretty happy with it.  Extending the gable beyond the hip was the key.  I had to extend it 2" on the right side and something similar on the left.  I found that with a minimal extension, the shadow board and other trim woudl extend beyond the peak of the roof into open space, and sometimes the roof finish would extend or I'd see the bare plywood sheathing.  I'm guessing that softplan doesn't know where to terminate the roof if the other roof doesn't clearly cut off all the trim on the first.  It was interesting- as I could have the whole thing working and then realized I had forgotten a shadow board on one side.  As soon as I turned that on, it would get screwed up.  


But I can live with the 2" offset.  I learned that I can show my elevations in profile mode to get rid of a lot of errant lines and the appearance of the 2" offset.  I can keep the lines I need between surfaces as long as they are different materials.

Attached Thumbnails

  • Roof.jpg


#19 Joseph Smith

Joseph Smith

    Advanced Member

  • Members
  • PipPipPip
  • 824 posts
  • LocationWI

Posted 15 January 2024 - 03:58 PM

Looks great Dennis.  your gable off the back could be done the same way if you get picky..ha..ha..


Joseph A. Smith

http://granitedesigngroup.com


#20 Mark Petri

Mark Petri

    Advanced Member

  • Members
  • PipPipPip
  • 1,512 posts
  • LocationEvergreen, CO

Posted 16 January 2024 - 01:26 PM

Has anyone had success with added gables on roofs built on odd angles working as well and the more typical X,Y axis? I seem to always have trouble with roofs not wanting to clean up when there are odd angles thrown into the model. In the current case, the owner wants a garage addition at 10deg off the front wall of the existing house. I get a few different issues and often find hidden beams help, but in this case the beams do not seem to let the roof ridges totally clean up no matter what I do. Yes, I can turn the ridge cap off, but I still get odd lines, and frankly do not want to have to turn things off and do so much messing around to get a roof to model correctly.


Yes, I tried matching roof planes. I tried keeping lollipops on the walls, I tried several other work-arounds. I've consistently had trouble with walls at angles that SP deems odd. It gets quite frustrating.

Attached Thumbnails

  • SP Roof Woes 001.jpg
  • SP Roof Woes 002.jpg

Mark Petri

Petri Building and Design


0 user(s) are reading this topic

0 members, 0 guests, 0 anonymous users