Jump to content


Photo

Model Paint


  • Please log in to reply
12 replies to this topic

#1 John Pepper

John Pepper

    Advanced Member

  • Administrators
  • 406 posts

Posted 10 June 2015 - 12:58 PM

In another thread a method was discussed for blending textured elevations and line drawings.  It appeared to me that some of the power and features of model paint may have been overlooked.


Model Paint was introduced to provide a comprehensive way to blend the look of line drawings with rendered elevations.


line_drawing.png  textured.png


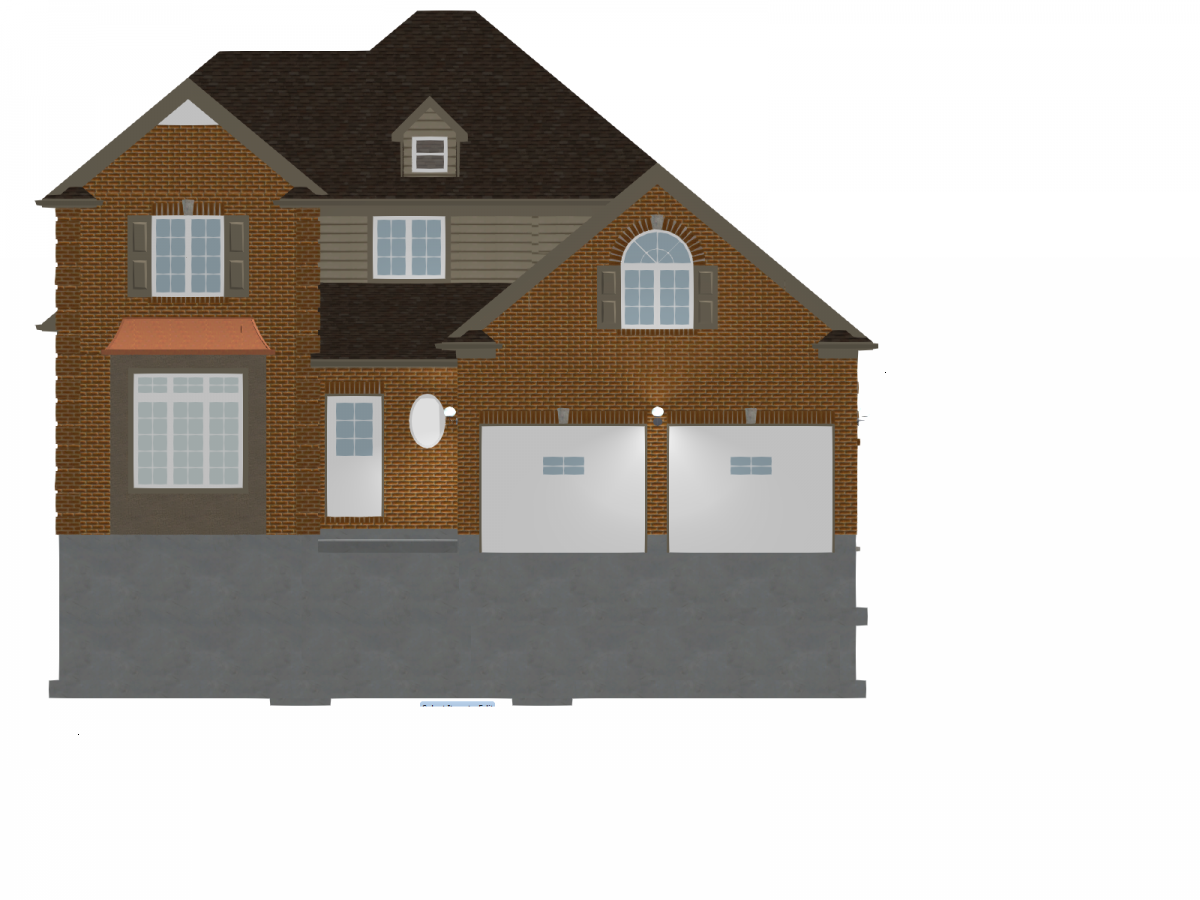
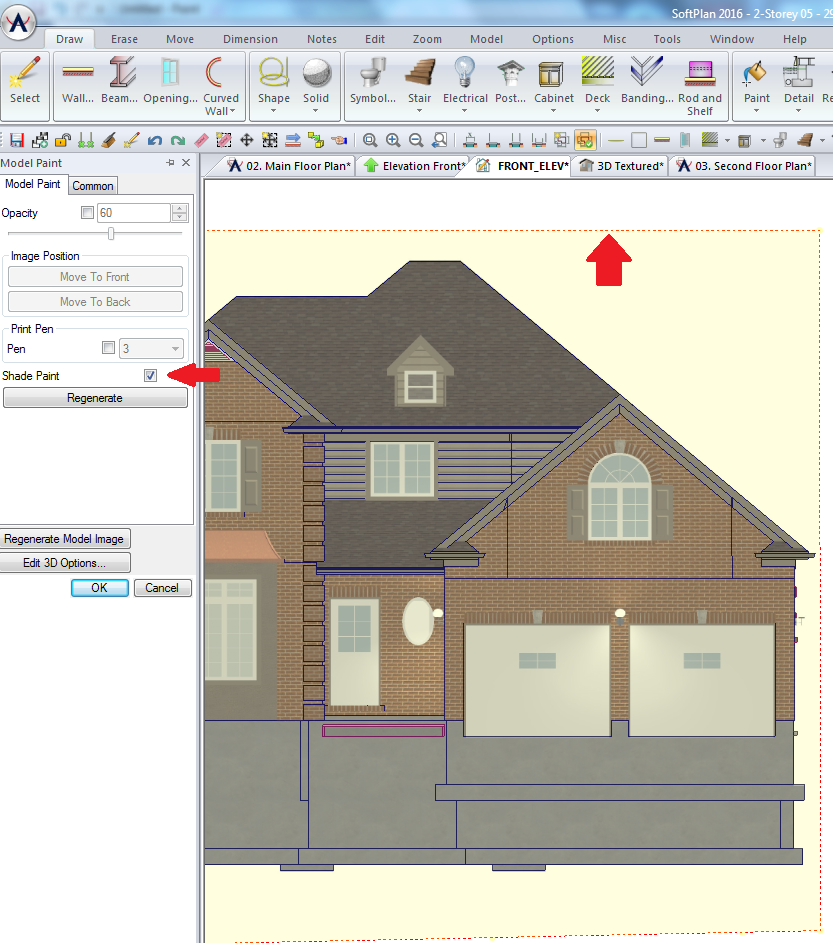
When you save an elevation drawing out of 3D, Pick the option to add model paint.  It will paint the walls and roofs using the rendered image while leaving symbols and openings as vector objects.


elevation_with_auto_paint.png


The paint has a lower opacity so that it isn't as dominant in the image.  You can edit the opacity to increase the paints prominence.

opacity.png


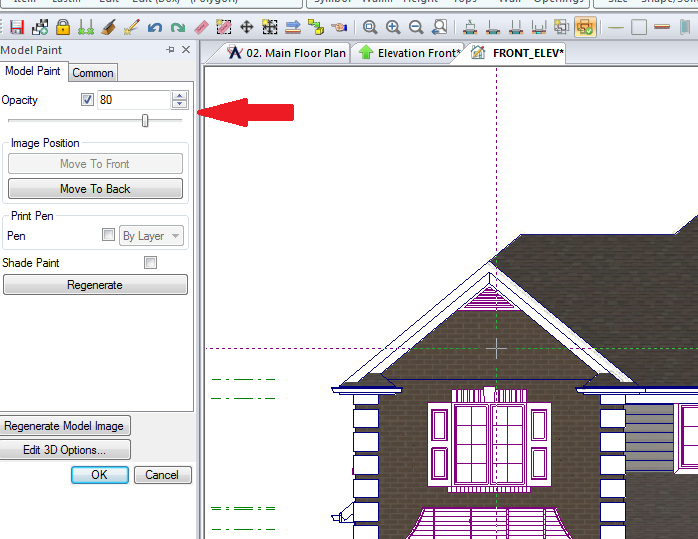
If you are not satisfied with what has been painted and what has been left unpainted, you can always paint more areas in the same way you did with vector paint. Just select Draw->Paint->Model->Model Paint and click on the areas you would like painted.


manual_model_paint_menu.png


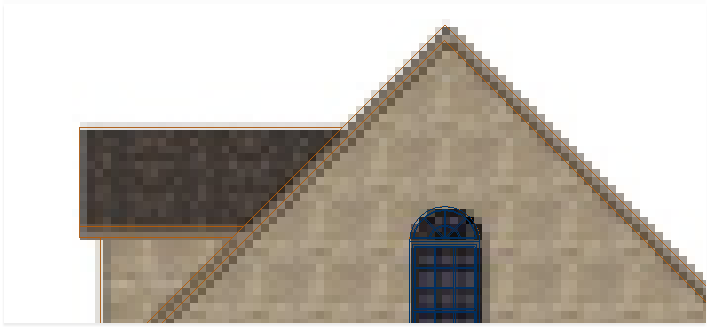
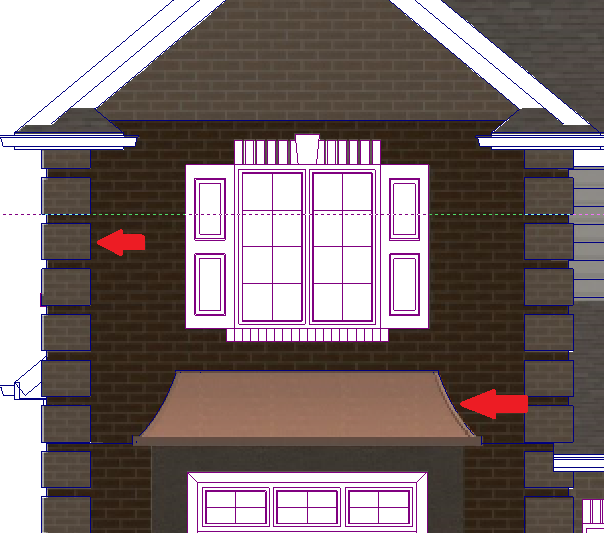
Here I have painted the quoins and the metal roof areas.  Notice that I didn't have to pick any color or texture. Model paint pulls that directly from the full rendered model.

painting_coins_and_metal_roof.png


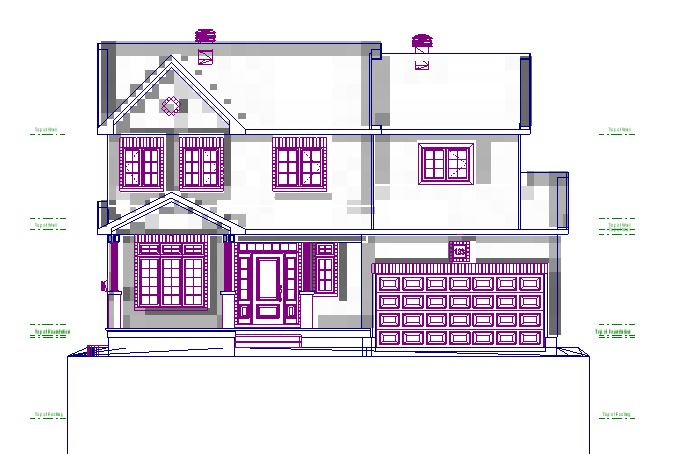
Now as in the other post: Some people prefer to have the entire model painted and just have the lines overlayed.  This is really easy to do with model paint.

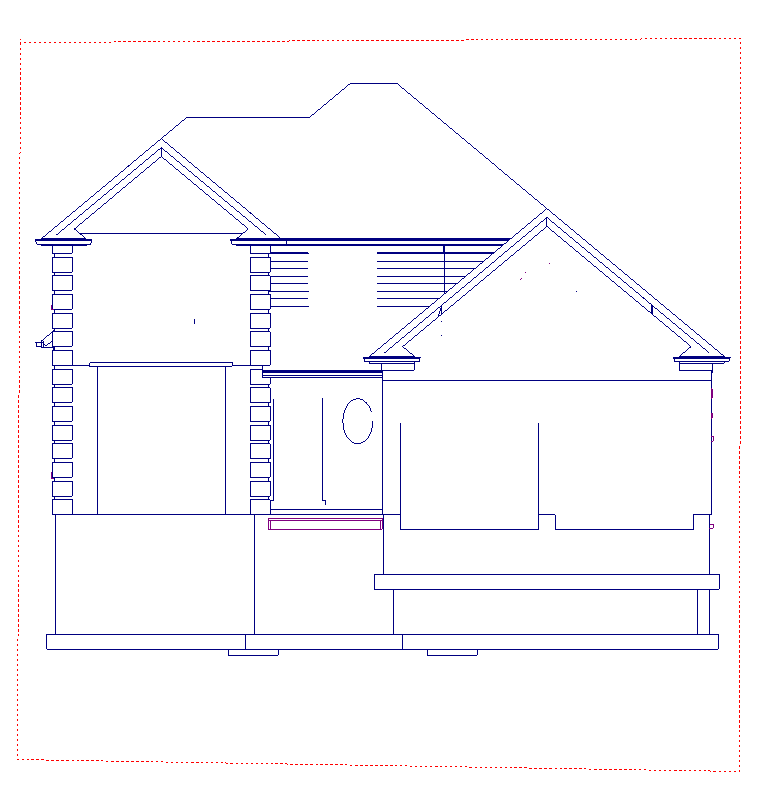
Just start with the saved line drawing and erase lines and symbols that you don't want.  Then draw shade brakes around the house (Draw->Paint->Shade Break)

symbols_removed.png   draw_shade_brakes_around_the_house.png


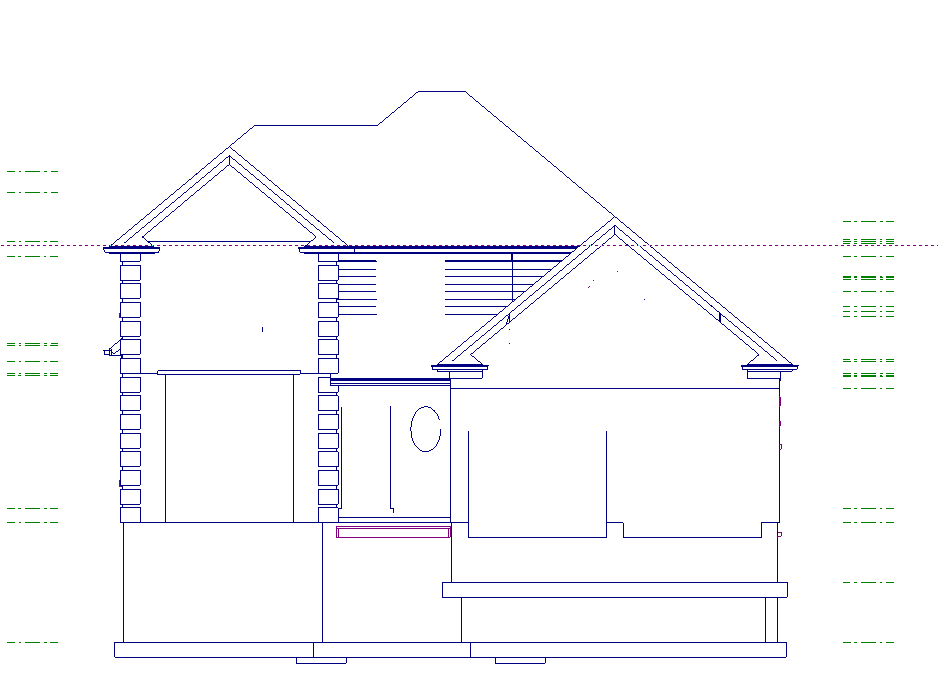
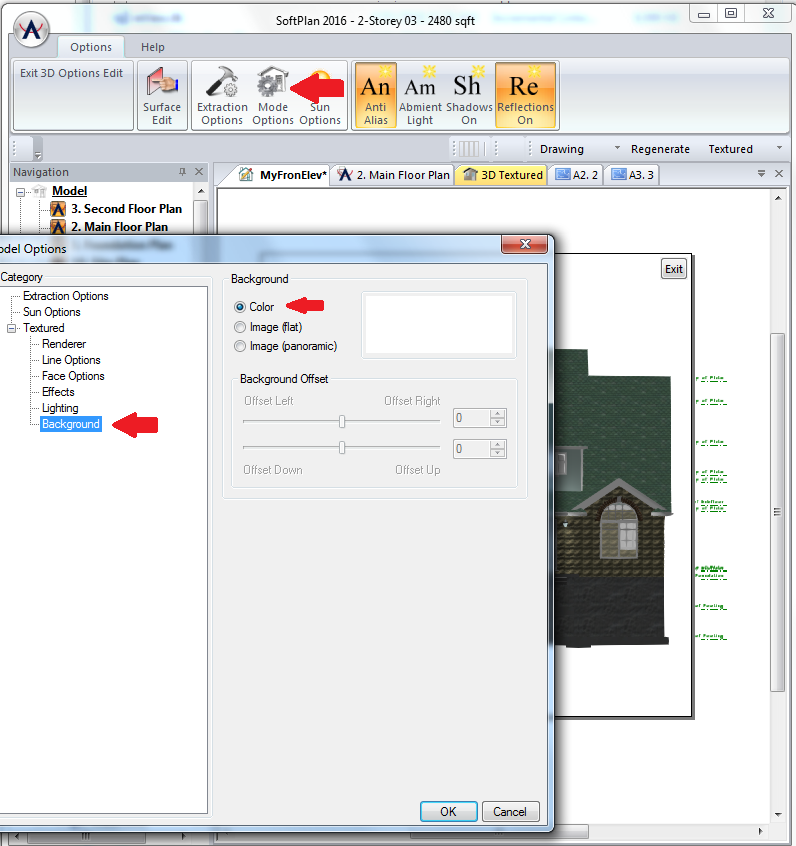
Use model paint to paint the roof

paint the roof.png


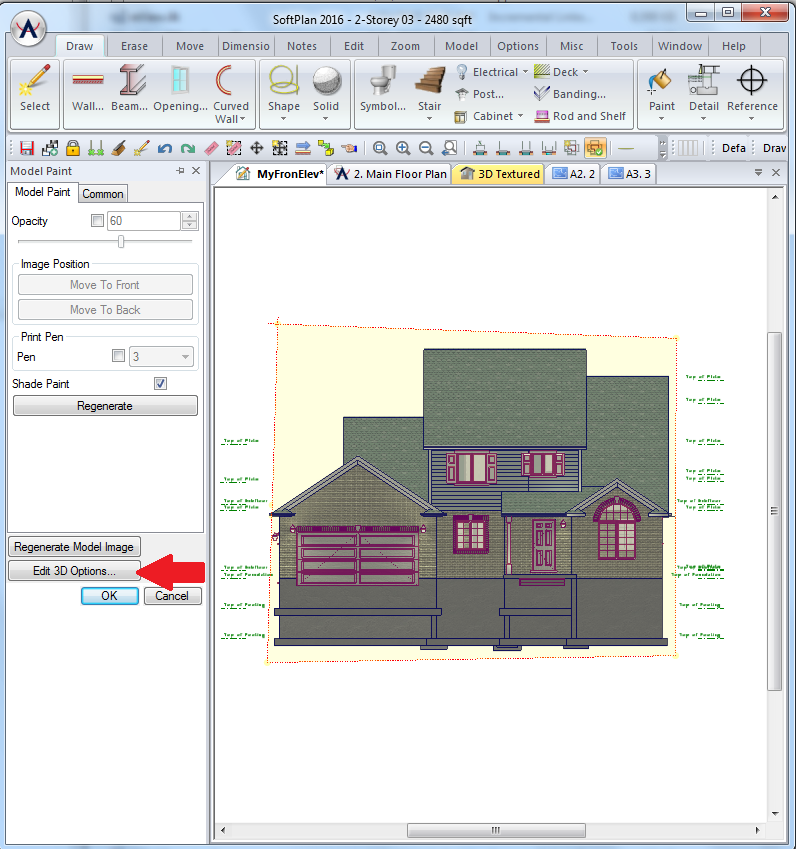
Edit the paint and change it to be "Shade Paint".  The entire house will be painted and will extend to the shade breaks.

shade_break.png


Stay tuned for part 2.


  • Philip Frank, Thomas Davis and Keith Almond like this

#2 randolph cohn

randolph cohn

    Advanced Member

  • Members
  • PipPipPip
  • 869 posts
  • Locationmarin county - california

Posted 10 June 2015 - 02:13 PM

john,


nice tutorial,


thanks for the heads up on "model paint"


thanks


randy

v10 to future 2016+ ;)


#3 Keith Almond

Keith Almond

    Advanced Member

  • Members
  • PipPipPip
  • 5,099 posts
  • LocationBrockville, Ontario, Canada

Posted 16 June 2015 - 07:30 AM

Very interesting.


How could "WE" (WE being NON Softplan personnel), know about that, how is it documented, because that's a VERY unintuitive way to use the paint.


Keith

There are 10 types of people in this world ....... Those who understand binary, and those who don't.

Softplan user since version 5.5.2.5

www.homehardwarekingston.ca

#4 Thomas Roman

Thomas Roman

    Advanced Member

  • Members
  • PipPipPip
  • 341 posts
  • LocationSacramento, CA

Posted 16 June 2015 - 08:40 AM

All 2016 new features are itemized with videos and images and full.descriptions on the softplan website.... also an itemized "list" of all new features is available as a color brochure... does that ship with the program? I'm not sure..
Manual is available on line.. no longer a hard copy, as most already know..
Softplan offers training seminars on line..

#5 Keith Almond

Keith Almond

    Advanced Member

  • Members
  • PipPipPip
  • 5,099 posts
  • LocationBrockville, Ontario, Canada

Posted 16 June 2015 - 11:24 AM

Thomas, I don't believe that level of detail is documented. I've tried to find it in both the help files and the Softplan website, and CAN'T. That doesn't mean it doesn't exist, just I can't find it. Can someone point me to it? Please.


Keith

There are 10 types of people in this world ....... Those who understand binary, and those who don't.

Softplan user since version 5.5.2.5

www.homehardwarekingston.ca

#6 John Pepper

John Pepper

    Advanced Member

  • Administrators
  • 406 posts

Posted 16 June 2015 - 11:47 AM

In the help you should check out the section on "Adding Model Paint to an Area" which describes what model paint is and how it works.

Shade paint has been around forever.  It allows you to paint areas enclosed by shade breaks and ignores everything else.  See the section on "Adding Shaded Patterns to Elevations".

Automatic Paint is described in the "Saving an Elevation" section.

As Thomas mentioned, you may want to check out the videos that show Auto Paint Elevations and Automatic Shadows in action.


Those are the descriptions of the tools used in the above tutorial.  The program has a very powerful tool set and there is not necessarily a single way to combine the tools that works with everyone's process.

Discussing what techniques you are using and asking questions is a great way to figure out what can be accomplished.  Sometimes the people who designed and implemented the software may see some tools that may have been overlooked and bring them to light.  We want you to use the program in the most efficient and effective way.  A little more of questions and discussion aspect and a little less rant aspect makes that more probable.


#7 Keith Almond

Keith Almond

    Advanced Member

  • Members
  • PipPipPip
  • 5,099 posts
  • LocationBrockville, Ontario, Canada

Posted 16 June 2015 - 12:57 PM

John, I do appreciate the input, and apologise for the rant. Although I suspect that a few of us (mostly out of frustration) do rant occasionally ...


The help sections that you have pointed out do not really imply that you can edit the paint features in the way you have shown, and even reading them again, knowing what you show is possible, they still don't point to that level of control - and neither does the video.


However, I do hope to learn.


I cannot remove the cloud background in my model paint. How can I do that?


The model paint seem to be only in Textured (or rendered) Mode. Editing 3D options in the paint dialogue box. Doesn't do anything. Should it?


Keith

There are 10 types of people in this world ....... Those who understand binary, and those who don't.

Softplan user since version 5.5.2.5

www.homehardwarekingston.ca

#8 Keith Almond

Keith Almond

    Advanced Member

  • Members
  • PipPipPip
  • 5,099 posts
  • LocationBrockville, Ontario, Canada

Posted 16 June 2015 - 01:43 PM

If I generate the elevation with the site showing, the model paint generated on the Softplan drawing is VERY coarse. NEITHER Right Click "Regenerate Image" or EDIT "Regenerate" or EDIT "Regenerate Model Image" seem to do anything. Edit 3D Options doesn't do anything either.


Keith

There are 10 types of people in this world ....... Those who understand binary, and those who don't.

Softplan user since version 5.5.2.5

www.homehardwarekingston.ca

#9 John Pepper

John Pepper

    Advanced Member

  • Administrators
  • 406 posts

Posted 16 June 2015 - 01:44 PM

Edit your paint pattern and go to Edit 3D Options

1.png


An embedded 3D Elevation opens up.  

Change the Drawing Mode.  (You may need to hit Regenerate to refresh the image..)

Hit the exit button either on the ribbon or on the embedded window.

2.png


The elevation paint will update on exit.

3.png


Similarly when editing the 3D Options you can edit the options for the mode of interest.  You can change the background color to white.

(Again you may need to hit regenerate to refresh the image)

4.png


You could also trace around the house with shade breaks masking out the background clouds if you didn't want to change the background color of your mode.. however that is much more labor intensive.


#10 Keith Almond

Keith Almond

    Advanced Member

  • Members
  • PipPipPip
  • 5,099 posts
  • LocationBrockville, Ontario, Canada

Posted 16 June 2015 - 02:28 PM

Thanks John. Didn't expect the Mode options on the Bar, was looking for them in the window the same as in the plan sets.


Still need to sort out the coarseness .... This looks too coarse.


2015.06.16_16h16m37s_001.png


I suspect it is to do with the size of the site. Don't know how I can regenerate it to be smoother.


Keith

There are 10 types of people in this world ....... Those who understand binary, and those who don't.

Softplan user since version 5.5.2.5

www.homehardwarekingston.ca

#11 John Pepper

John Pepper

    Advanced Member

  • Administrators
  • 406 posts

Posted 16 June 2015 - 02:57 PM

The ribbon gives many more tools than could be represented on a single dialog.  The coarseness you are seeing is probably related to your site and the size of it.  There isn't an option to control that.  
Reducing the area of your site plan would be your best recourse if you wish to display the site on your elevation.
 
If you submit a ticket using the project you are seeing the issue on, it can be used for future testing of improvements and features.


#12 Keith Almond

Keith Almond

    Advanced Member

  • Members
  • PipPipPip
  • 5,099 posts
  • LocationBrockville, Ontario, Canada

Posted 02 March 2016 - 09:39 AM

Just re-read this thread, and started putting MODEL PAINT into practice - Had a little time over the winter. I must admit that being stubborn, I was sticking to a method that worked well for me.


Still, I didn't realise how powerful the model paint is. Will probably use it much more now that I've got a better handle on it. Thanks John. Excellently documented.


Keith

There are 10 types of people in this world ....... Those who understand binary, and those who don't.

Softplan user since version 5.5.2.5

www.homehardwarekingston.ca

#13 Yvon Gonthier

Yvon Gonthier

    Advanced Member

  • Members
  • PipPipPip
  • 1,288 posts
  • LocationOttawa

Posted 03 March 2016 - 09:46 AM

I've never pushed it to far because I get strange output when saving an elevation with model paint. I tried it again with an existing model and this is what I get for the elevation "Model paint elevation". Included is the 3D as a reference.

I'm I doing something wrong or it's not compatible with models done in the previous versions?

Attached Thumbnails

  • 3D model.JPG
  • Model paint elevation.JPG


0 user(s) are reading this topic

0 members, 0 guests, 0 anonymous users